Best Way To Cut Stainless Sheet Metal
Alright, so you’ve got a hankering to tackle some stainless steel sheet metal. Maybe you’re building a killer DIY barbecue pit, crafting some fancy kitchen backsplash, or perhaps you’re just one of those folks who likes making shiny things. Whatever your brilliant idea, cutting stainless steel can feel a bit… intimidating. Like trying to convince a cat to take a bath. But fear not, my friend! It’s totally doable, and with the right know-how, you’ll be slicing through that silvery goodness like a hot knife through butter. Well, maybe not that easy, but definitely manageable. We’re going to break it down so you can get your project looking sharp without a ton of fuss.
First things first, let’s talk about the star of the show: stainless steel sheet metal. It’s awesome because it’s tough, corrosion-resistant, and looks super sleek. But that toughness is exactly what makes it a bit of a diva to cut. Unlike your regular old mild steel or even aluminum, stainless steel is… well, stainless and also harder. This means you need the right tools and techniques to avoid frustration, melted edges that look like a sad Dali painting, and maybe even a band-aid or two. Nobody wants extra accessories for their project, right?
So, what are the best ways to get this done? We’re going to explore a few popular methods, from the old-school trusty tools to some of the newer, fancier gadgets. Think of this as your personal roadmap through the stainless steel jungle. We’ll cover what you need, how to use it, and what to watch out for. No need to break out your trigonometry textbook, I promise. This is all about practical, get-it-done advice.
The Go-To Gear: Your Cutting Arsenal
Before we even think about making a single cut, let’s get your toolkit in order. Having the right equipment is half the battle, maybe even three-quarters. Trying to cut thick stainless steel with a flimsy pair of scissors is like trying to herd squirrels with a feather – utterly pointless and likely to end in a mess.
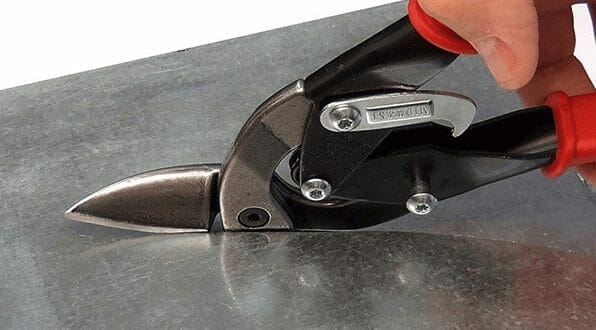
1. Snips: The Handheld Heroes (For Lighter Gauges)
If you’re working with thinner stainless steel (think 20 gauge or lighter, maybe up to 18 gauge if you’re feeling strong and have good technique), aviation snips are your best friends. These aren't your grandma's sewing scissors; they're built for metal!
You’ll want to grab a few types: * Straight-cut snips: These are your all-rounders. Good for cutting in a straight line or making gentle curves. They usually have yellow handles. * Left-cut snips: These are designed to cut curves to the left, making your life easier when you need to go in that direction. Blue handles are the usual giveaway. * Right-cut snips: And you guessed it, these cut curves to the right! Red handles.
Why three? Because trying to force a straight-cut snip into a tight curve is like trying to fit a square peg in a round hole – it’s going to bend the metal awkwardly and strain your wrists. Having the right snip for the job makes all the difference. Think of them as specialized ninja tools for your hands!
How to use them: * Mark your line: Use a permanent marker or a scribe to draw your cutting line clearly. * Start the cut: Get a good grip and begin at the edge of the metal. * Keep it steady: Make smooth, controlled cuts. Don’t try to take huge bites. Little, consistent snips are better than big, jerky ones. * Watch the blade: Keep the blades aligned with your cut line. Don’t let them wander off course. * Support the metal: Try to keep the metal flat as you cut, especially on longer cuts. This prevents warping. * Take breaks: Your hands will thank you. Seriously, I’ve had wrist cramps that made me question my life choices. Take it easy!
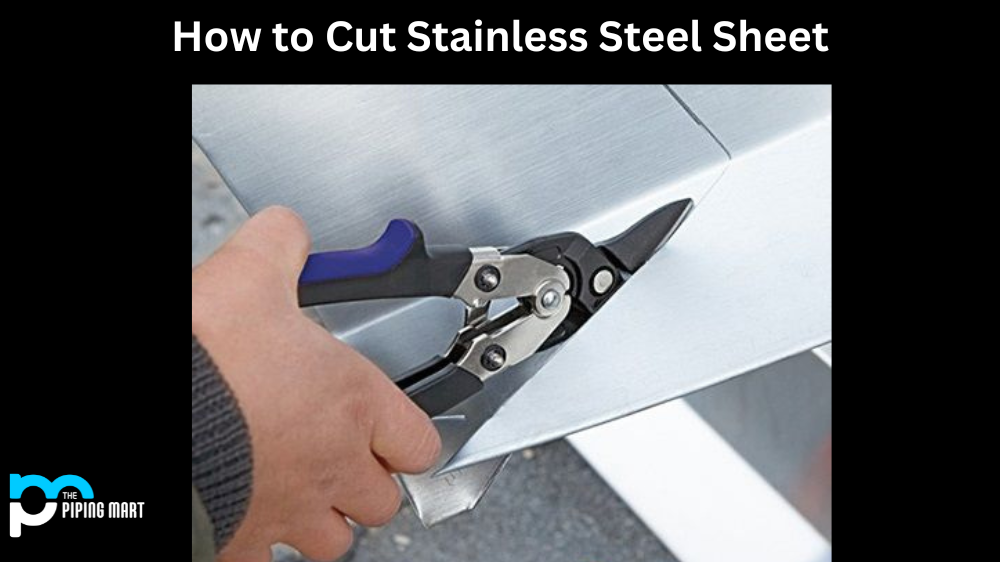
Pros: Affordable, portable, no power needed. Great for small projects and detailed work. Cons: Can be tiring for long cuts or thicker metal. Can leave a slightly rough edge that needs filing. Not ideal for very thick sheets.
2. The Mighty Jigsaw: Versatility King
If you’ve got curves to cut, or you’re dealing with metal that’s a bit thicker (up to about 1/8 inch, depending on the blade), a jigsaw is a fantastic option. It’s like the Swiss Army knife of cutting tools – it can do so many things!
The secret sauce here is the blade. You absolutely must use a blade designed for cutting metal. Wood blades will just laugh at stainless steel and probably snap. Look for blades labeled for "sheet metal" or "metal cutting" with a fine tooth count. The finer the teeth, the cleaner the cut, but the slower you’ll go. It’s a trade-off!
How to use it: * Secure your workpiece: This is crucial. Clamp the sheet metal down firmly to a workbench or a stable surface. Any movement will make for a nasty, unpredictable cut. * Use a cutting fluid or lubricant: This is your secret weapon for clean cuts and extending blade life. A few drops of cutting oil or even a bit of WD-40 can make a world of difference. It cools the blade and the metal, reducing friction and that awful screechy sound. * Start slow: Begin your cut with the jigsaw set to a moderate speed. Let the blade do the work. Don’t force it. * Follow your line: Keep the base of the jigsaw flat against the metal and guide it along your marked line. * Peel, don’t push: Think of it as gently peeling the metal away, rather than aggressively pushing through it. * Manage the offcut: As you cut, the piece you’re removing might start to sag. Be ready to support it so it doesn’t snag the blade and cause a problem. * Wear safety glasses! Seriously, metal shavings fly. Protect those peepers.
Pros: Excellent for curves and intricate shapes. Relatively easy to control. Good for medium-thickness metal. Cons: Can be slower than other methods. Requires careful clamping and use of lubricant. Can still leave a slightly burred edge.

3. Angle Grinder: The Powerhouse (With Caution!)
Ah, the angle grinder. The tool that can do almost anything, from grinding welds to… well, cutting metal. It’s powerful, fast, and can chew through thicker stainless steel like nobody’s business. However, it also demands respect. This is not a tool to mess around with. Think of it as a very enthusiastic, but slightly reckless, puppy. Fun, but needs supervision!
For cutting metal, you’ll want to use a cut-off wheel specifically designed for metal. Again, no wood-cutting wheels here! These wheels are thin and designed to slice. Make sure it's rated for stainless steel. Some wheels are better than others.
How to use it: * Safety first, last, and always: Wear a full face shield (not just glasses!), thick gloves, ear protection, and sturdy clothing. Angle grinders are loud, throw sparks like a fireworks factory, and can kick back unexpectedly. Seriously, do not skip on safety gear. I’ve seen people get hurt because they thought they were too cool for precautions. Don’t be that person. * Secure the workpiece: Just like with the jigsaw, clamping is non-negotiable. The metal must be absolutely still. * Use the right wheel: Ensure the cut-off wheel is securely attached and rated for metal. * Approach with respect: Hold the grinder firmly with both hands. * Start the cut at an angle: Don’t plunge straight down. Start with the wheel at a slight angle to the metal and then gradually bring it to a perpendicular cut. * Let the tool do the work: Don’t force the grinder. Let the spinning wheel do the cutting. Apply steady, even pressure. * Keep sparks away: Be aware of where the sparks are flying. Avoid flammable materials. * Don’t over-cut: Try to stop the cut precisely on your line. Going too far can create unwanted notches. * Cooling: This is where things get hot! You might need to let the metal cool down between cuts, or use a spray bottle of water to cool the area down. Just be careful not to spray water directly onto a super hot grinder motor. * Be prepared for noise and vibration: This is the most aggressive method, so it’s going to be loud and vibrate a lot. Take breaks if you need to.
Pros: Fast, powerful, excellent for thicker metal. Can make straight cuts efficiently. Cons: Can be dangerous if not used correctly. Generates a lot of heat and sparks. Can leave a rougher edge that needs significant cleanup. Not ideal for intricate curves.
4. Plasma Cutter: The Futuristic Fancy Pants
Okay, now we’re entering the realm of the high-tech. If you’re doing a lot of metal work or dealing with thicker stainless steel regularly, a plasma cutter is a game-changer. It uses a superheated ionized gas (plasma, hence the name!) to melt and blow away the metal, creating a clean cut.
This is not your average weekend warrior tool, as they can be pricey. But if you have access to one, or are considering investing, they are incredibly efficient.
How to use it: * Read the manual: Seriously, every plasma cutter is a little different. Get familiar with yours. * Set up your power source: Plasma cutters need compressed air and electricity. Make sure everything is hooked up correctly. * Ground the workpiece: You need a good ground clamp connected to your metal. * Follow the manufacturer’s recommendations: This includes settings for amperage, air pressure, and the correct consumables (like tips and electrodes). * Practice makes perfect: It takes a bit of practice to get smooth, straight cuts. Start on scrap pieces. * Maintain a consistent distance: Hold the torch at the recommended distance from the metal. * Move steadily: Guide the torch along your cut line at a consistent speed. * Beware of the heat: Even though it melts, the metal and the torch can get hot. * Clean up is usually minimal: Plasma cutters tend to leave a cleaner edge than grinders, but you might still have some small dross (molten metal residue) to clean up. * Safety gear is still a must: You’ll still need eye protection (plasma arcs are bright!), gloves, and ventilation because of the fumes.
Pros: Very fast and efficient. Can cut thicker metal with ease. Produces a relatively clean cut. Good for both straight lines and curves. Cons: Expensive initial investment. Requires compressed air. Can be noisy. May still require some minor cleanup of dross.
5. Metal Cutting Saw (e.g., Chop Saw, Bandsaw): Precision Powerhouses
For perfectly straight, clean cuts, especially on thicker stock or when you need a lot of precision, a dedicated metal cutting saw is the way to go. Think chop saws or bandsaws equipped with the correct blades.
These are more like stationary workshop tools. If you’re building something big and need many identical pieces, or require very precise lengths, this is your ticket.

How to use them: * Use metal-specific blades: Just like with the jigsaw, a wood blade will be a disaster. Get a blade designed for ferrous metals. * Set up your angles: Ensure your saw is set to the precise angle you need. * Secure the material: Use the saw’s clamps to hold the metal firmly. * Let the saw do the work: Don’t force the material into the blade. Let the saw’s motor and blade speed handle the cutting. * Cooling: Some metal cutting saws have integrated coolant systems, which is a huge bonus. If yours doesn't, you might need to apply a lubricant manually. * Safety: These tools have guards for a reason. Keep your hands clear of the blade path. Wear your safety gear!
Pros: Highly accurate and repeatable cuts. Excellent for straight cuts. Can handle thicker materials efficiently. Cons: Limited to straight cuts (unless it’s a bandsaw with specialized blades and technique). Can be expensive. Less portable than handheld tools.
General Tips & Tricks for a Smooth Cut
No matter which method you choose, a few universal truths apply when you’re wrestling with stainless steel:
- Measure Twice, Cut Once: The old adage is especially true here. A mistake on stainless steel is harder to fix than on softer metals.
- Cooling is Key: Stainless steel generates a lot of heat when cut. Overheating can warp the metal, dull your tools, and create a less precise cut. Use cutting fluids, water (carefully!), or take breaks to let things cool down.
- Lubrication is Your Friend: A good cutting fluid or lubricant reduces friction, which means less heat, less tool wear, and a cleaner cut. Don’t skip this!
- Start Slow and Steady: Patience is a virtue, especially with stainless. Let your tool do the work. Rushing leads to mistakes and potentially dangerous situations.
- Edge Cleanup: Expect to do some filing or sanding after most cutting methods. A deburring tool, a metal file, or some sandpaper (starting with coarser grits and moving to finer ones) will smooth out any rough edges. This also makes the piece safer to handle.
- Ventilation: When cutting metal, especially with power tools, fumes can be generated. Make sure you’re in a well-ventilated area or use a respirator.
- Know Your Stainless Steel Type: Different grades of stainless steel (like 304 or 316) have slightly different properties, but the cutting methods are generally similar. For most DIY projects, you’re likely working with common grades.
The Grand Finale: Finishing Touches and Feeling Proud
So there you have it! You’ve navigated the world of cutting stainless steel sheet metal. Whether you went the humble snips route, tamed the mighty jigsaw, or bravely faced the angle grinder (with all its sparks and glory!), you’ve done the hard part. The key is to choose the right tool for your specific project and material thickness, and to always prioritize safety.
Don’t get discouraged if your first cut isn’t perfectly pristine. Metalworking is a skill that improves with practice. Think of each cut as a stepping stone to your next, even better creation. Every time you tackle a project like this, you’re learning, growing, and building something awesome with your own two hands. And that, my friend, is incredibly satisfying. So go forth, get cutting, and be proud of what you make. Your shiny new stainless steel creation awaits!