Diy Corrugated Metal Planter Box

Ever felt that itch? The one that whispers about bringing a little more green into your life, a touch of nature to offset the hustle? Maybe it’s the lingering scent of summer rain or a sudden craving for homegrown basil that gets you going. Whatever the spark, there's a primal joy in getting your hands dirty and nurturing something from seed to harvest. And what better way to embrace this burgeoning green thumb than with a planter box that’s as stylish as it is sturdy? Forget those flimsy plastic things that crack after a season. We’re talking about a DIY corrugated metal planter box – the kind that whispers of industrial chic, withstands the elements, and practically screams, "I’m effortlessly cool."
Think of it: a sleek, metallic silhouette gracing your patio, balcony, or even a sun-drenched corner of your kitchen. It’s a statement piece, a conversation starter, and a practical haven for your favorite herbs, vibrant flowers, or maybe even a compact vegetable patch. This isn't just about planting; it's about cultivating a little slice of tranquility, a tangible connection to the earth, right where you live. And the best part? You don't need a degree in engineering or a workshop filled with fancy tools to make it happen. We're going for an easy-going, almost meditative approach, the kind that makes you feel like you’ve stumbled upon a secret gardening hack that’s also incredibly chic.
The Corrugated Charm: Why Metal?
So, why corrugated metal, you ask? It’s more than just a trendy aesthetic. Corrugated metal, often found adorning sheds and industrial buildings, possesses an undeniable rustic-modern appeal. Its ribbed texture adds visual interest, catching the light in fascinating ways. But beyond its good looks, it’s also incredibly durable. Unlike wood, it won't rot or warp. Unlike some plastics, it won't become brittle in the sun. It’s a material that’s built to last, to age gracefully, and to become a part of your home's story.
Plus, let's be honest, there's something inherently satisfying about working with metal. It has a certain gravitas, a feeling of permanence. It reminds me a bit of those old-school diner countertops or the iconic Eames furniture – pieces designed to be functional, beautiful, and enduring. It’s that blend of grit and grace that makes corrugated metal such a perfect candidate for your DIY planter project.
And here’s a fun little fact for you: corrugated metal was first patented in the mid-19th century. Initially, it was used for roofing and siding on agricultural buildings. It was a game-changer, offering a lightweight, strong, and weather-resistant alternative to traditional materials. So, when you're assembling your planter, you're tapping into a rich history of practical innovation!
Gathering Your Treasures: What You'll Need
Let's dive into the nitty-gritty. Don't be intimidated. We're keeping this simple and accessible. Think of it as a curated shopping list for your creative endeavors. The star of the show, of course, is the corrugated metal sheeting. You can often find this at your local hardware store or specialized metal suppliers. Look for something with a decent gauge – not too thin that it bends easily, but not so thick that it's impossible to work with. A common choice is 26 or 28 gauge.
You'll also need some lumber for the frame. Cedar or redwood are excellent choices because they are naturally resistant to rot and insects, meaning your planter will last even longer. Pine is a more budget-friendly option, but you’ll want to treat it with a sealant for better longevity. Aim for boards that are at least 1x4 or 1x6 inches, depending on the desired depth of your planter. We’re building this to last, after all!

Other essentials include:
- Metal screws or rivets: For attaching the metal sheeting to the wooden frame.
- Corner brackets: To reinforce the wooden frame for extra sturdiness.
- Wood screws: For assembling the wooden frame.
- A saw: A handsaw will do the job, but a circular saw or miter saw will make things quicker and cleaner.
- A drill with appropriate bits: For pre-drilling holes and driving screws.
- Measuring tape and a pencil: For accurate cuts.
- Safety glasses and gloves: Always prioritize safety! Metal edges can be sharp.
- Optional: Landscape fabric or heavy-duty plastic sheeting: To line the inside of the planter and prevent soil from washing out, while also protecting the wood from excessive moisture.
If you’re feeling particularly adventurous, you could even consider using reclaimed corrugated metal for a truly unique, vintage vibe. Scour architectural salvage yards or even old barns (with permission, of course!) for materials that tell a story.
The Build: A Step-by-Step Serenade
Alright, let’s get down to business. Think of this as a dance between wood and metal, guided by your hands. First, decide on the dimensions of your planter. A good starting point for a medium-sized planter might be 3 feet long, 1.5 feet wide, and 1 foot deep. But feel free to customize! This is your creation.
Step 1: Crafting the Wooden Skeleton
Measure and cut your lumber for the four sides of your planter box. For our example dimensions, you’d need two pieces of 3-foot lumber and two pieces of 1.5-foot lumber (minus the thickness of the other boards, depending on how you assemble them). Then, cut two more pieces for the end supports that will be the full height of your planter (1 foot in our example). These will provide internal support for the metal sides.
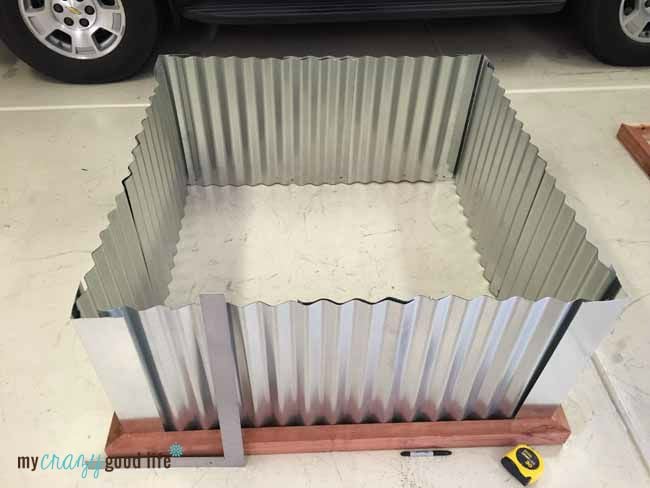
Assemble the outer frame first. Use wood screws to connect the side pieces to the end pieces. Pre-drilling pilot holes will prevent the wood from splitting. Once the outer frame is assembled, attach the internal support boards to the inside corners. Now, for extra strength, attach your corner brackets to the inside of the wooden frame. This is where your planter starts to feel solid.
A little tip: If you’re using pine, now is a good time to apply a couple of coats of outdoor-grade wood sealant. Let it dry completely according to the manufacturer's instructions. This will significantly extend the life of your wooden frame.
Step 2: Shaping the Metal Skin
Now for the fun part – the metal! Measure and cut your corrugated metal sheeting to fit the sides of your wooden frame. You’ll need four pieces for the long sides and two for the shorter ends. When measuring, add a little extra (about an inch or two) to each side for overlap. This will give you a nice, clean finish and ensure complete coverage.
Cutting metal can be a little tricky. A jigsaw with a metal-cutting blade or a specialized metal shear will make this much easier. If you're using tin snips, take your time and work in small sections. Remember those safety glasses and gloves – metal edges can be surprisingly sharp!
As you cut, try to keep the corrugations running in the same direction on all sides for a consistent look. It’s these little details that elevate a DIY project from functional to fabulous.
Step 3: The Grand Unveiling – Attaching the Metal
Lay your wooden frame on its side. Take one of your cut metal pieces and position it against the wooden frame, ensuring it’s aligned with the corrugations and has a slight overhang at the top and bottom. Now, using your drill and metal screws (or rivets), start attaching the metal to the wood. Drive the screws through the metal and into the wooden frame. Place screws about every 6-8 inches along the edges and also into the internal support boards. Pre-drilling small pilot holes in the metal can make this process smoother.
Continue this process for all four sides. For the corners, you can either have the metal overlap for a seamless look or create a slight mitered edge for a more defined corner. Overlapping is generally easier for beginners.
If you're using landscape fabric, now is a great time to staple it to the inside of the wooden frame, beneath where the metal will be. This will act as a barrier and help retain moisture.
Step 4: The Finishing Touches – Drainage and Flair
Your planter is taking shape! Before you fill it with soil, make sure it has adequate drainage. Drill a few holes in the bottom of the metal sheeting. If you've lined it with plastic sheeting (ensure it has holes too!), drill through both layers. A few 1/2-inch to 1-inch holes spaced out should be sufficient.

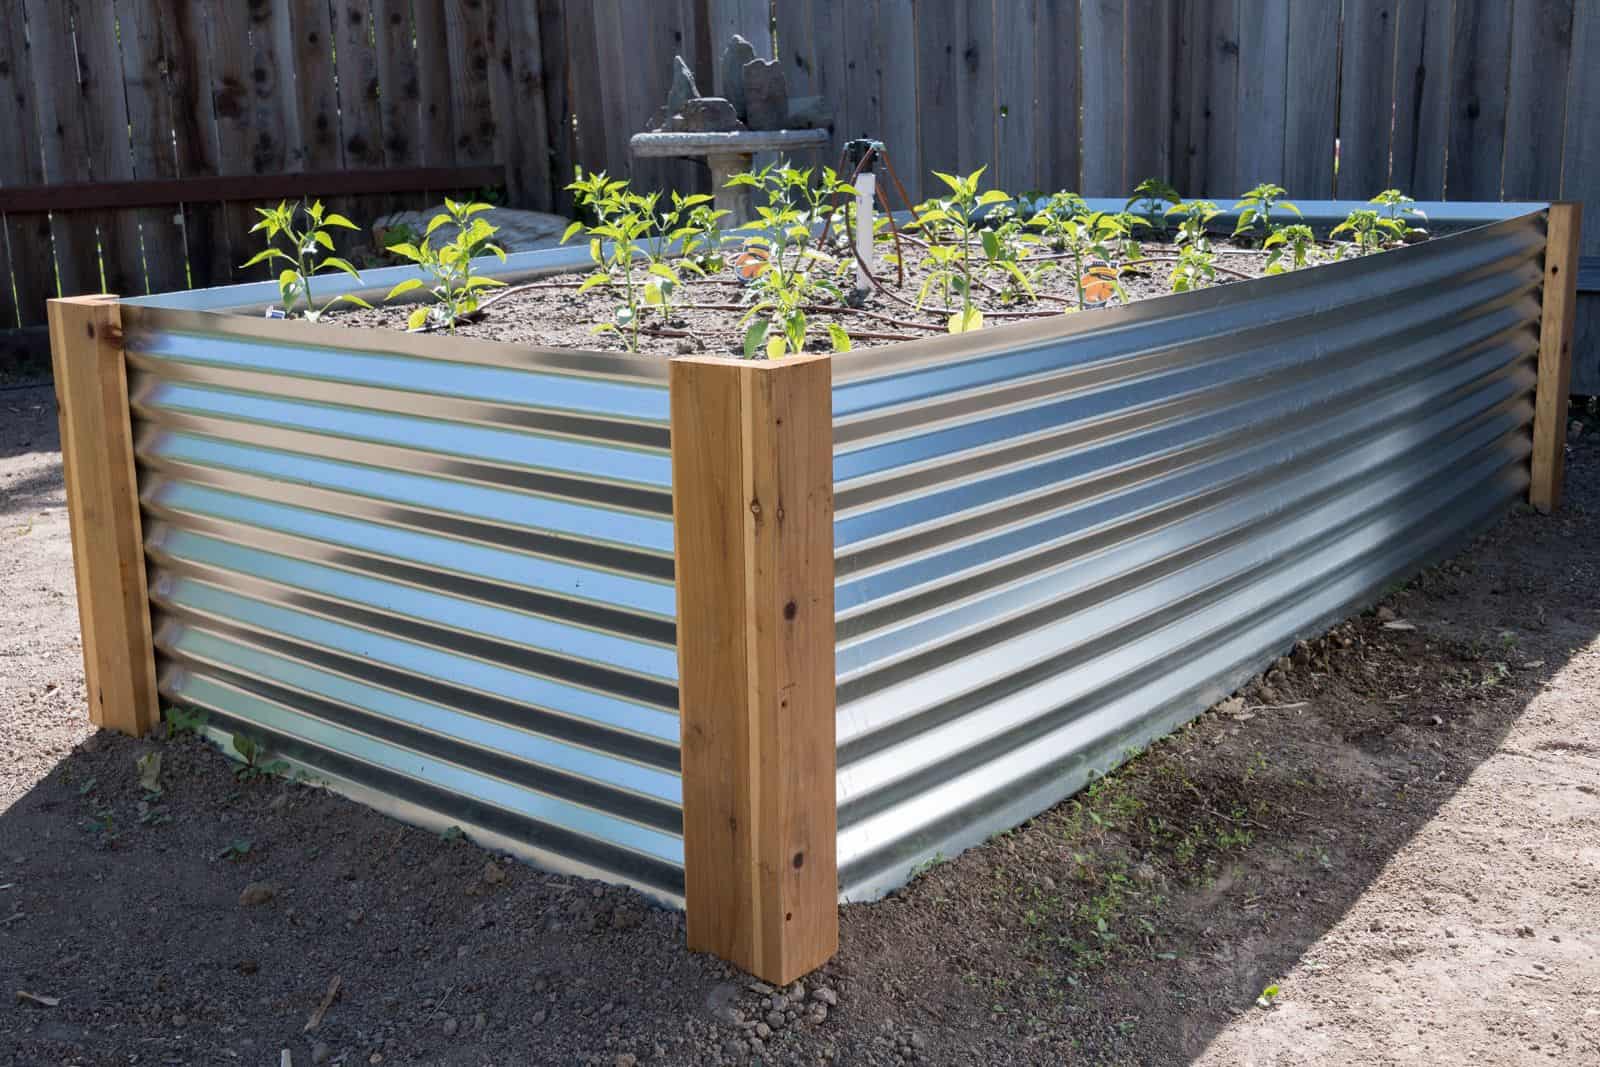
For a truly polished look, you can add trim pieces to the top edges. More lumber, cut to size and attached with wood screws, can create a nice lip. You could even paint the wooden frame or the metal with a high-quality exterior paint to add a pop of color or a sleek matte finish. Think about a deep forest green, a classic charcoal gray, or even a vibrant terracotta. The possibilities are as endless as your imagination!
Beyond the Build: Cultivating Your Corner
Now that your beautiful corrugated metal planter box is complete, the real joy begins: planting! Consider what you want to grow. For a sunny spot, vibrant petunias or trailing ivy will add instant charm. If you’re thinking culinary, a mix of basil, mint, rosemary, and thyme will transform your patio into a fragrant herb garden. Imagine snipping fresh mint for your morning tea or basil for a quick pasta sauce. It’s a small luxury that brings immense satisfaction.
When filling your planter, use a good quality potting mix. Avoid using garden soil, as it can compact too much in a container. Layering is key for good drainage: start with a base of gravel or broken pottery shards (if you’re not using landscape fabric), then add your potting mix.
And here’s a little cultural nod: the Japanese concept of Wabi-sabi celebrates imperfection and transience. Your metal planter, as it weathers over time, will develop a beautiful patina, a testament to its journey. Embrace it! It’s a reminder that beauty can be found in the aged and the imperfect.
A Reflection: Planting Seeds of Serenity
There’s something incredibly grounding about creating something with your own two hands. In a world that often feels chaotic and fast-paced, a DIY project like this planter box offers a welcome pause. It’s a chance to slow down, to focus on a tangible outcome, and to connect with the simple pleasure of making. As you fill your planter with soil and choose your first plants, you’re not just creating a garden feature; you’re cultivating a little oasis of calm. You’re planting seeds, not just of flowers or herbs, but of peace, of connection, and of a more mindful way of living. This planter box, standing strong and beautiful, will be a constant reminder of the joy that can be found in building, in nurturing, and in the gentle rhythm of growth, right outside your door.