How To Attach Wood To Steel Frame
So, picture this: I'm knee-deep in a DIY project, feeling all Martha Stewart and ready to conquer the world. I’d just finished building this absolutely killer bookshelf for my living room, all reclaimed barn wood, looking like something straight out of a Pinterest board. Then, disaster struck. My cat, Bartholomew (you know, the one with the perpetually judgmental stare), decided it was the perfect time to practice his ninja moves. Next thing I know, the whole darn thing wobbled like a drunken sailor and a corner started giving way. My beautiful creation was teetering on the brink of structural collapse. Utter chaos. My initial thought? "Okay, maybe I should have listened to that little voice in my head that said 'reinforce it.'"
That’s when it hit me. This wasn't just about pretty wood anymore. This was about stability. It was about making sure my magnificent creation – and by extension, any creation you might be dreaming up – doesn’t end up looking like a Jenga tower after a toddler’s tantrum. And often, especially in modern builds or when you're aiming for that industrial-chic vibe, you're dealing with the glorious, unyielding embrace of a steel frame. So, the burning question, the one that kept me up at night (after Bartholomew was safely secured in his catio), became: how do you actually get wood to play nice with steel?
It sounds simple enough, right? Just slap some wood onto a metal beam. Boom, done. If only it were that easy. Steel is, well, steel. It’s strong, it's rigid, and it doesn't exactly have a lot of natural give. Wood, on the other hand, is organic, it moves, it breathes (metaphorically speaking, of course). Marrying these two seemingly incompatible materials requires a bit of finesse, a touch of engineering know-how, and, most importantly, the right approach. Don't worry, though. We're not talking about rocket science here. We're talking about practical, doable methods that’ll have your wood components firmly (and stylishly!) attached to your steel frame. So, let’s dive in and make sure your projects stand the test of time… and mischievous felines.
The Big Picture: Why Wood Meets Steel
Before we get our hands dirty with the nitty-gritty, let's talk about why this combination even happens. You see it everywhere, don't you? That gorgeous modern home with the exposed steel beams and warm, inviting wood accents. Or maybe it's a sleek retail display where sturdy metal supports are softened by beautiful timber shelving. It’s a design marriage made in heaven, offering the best of both worlds: the raw, industrial strength of steel and the natural warmth and aesthetic appeal of wood.
Think about it: steel provides the structural backbone, the load-bearing capacity, the sheer grunt needed for larger projects. Wood, on the other hand, brings the beauty, the texture, the organic feel that makes a space feel like home. Whether you're building a custom workbench with steel legs and a solid wood top, framing out an interior wall with steel studs and then cladding it with wood panels, or creating a stunning architectural feature, understanding how to connect these materials effectively is key. It's the difference between a project that looks a bit slapped together and one that screams "professional craftsmanship." And who doesn't want that? Plus, a solid connection means less chance of Bartholomew staging another furniture rebellion.
The Nuts and Bolts (or Rather, The Bolts and Brackets): Common Attachment Methods
Alright, enough preamble. Let's get down to business. When it comes to attaching wood to a steel frame, there isn't a single "magic bullet" solution. The best method really depends on a few things:
- The type of steel frame you're working with: Is it a thick I-beam, a slender C-channel, or thin sheet metal studs?
- The size and weight of the wood piece: Are we talking a feather-light decorative panel or a hefty structural beam?
- The intended load and stress: Will this connection be supporting significant weight or just be purely decorative?
- Your tools and skill level: Some methods are more beginner-friendly than others.
But generally speaking, we’re looking at a few tried-and-true techniques that involve creating a stable interface between the two materials. It’s all about making sure the wood has something solid to grip onto, and that the connection can handle whatever you throw at it. Think of it like a handshake between two very different personalities – it needs to be firm, reliable, and mutually beneficial. We're going to explore the most common and effective ways to achieve this harmonious union.
Method 1: The Power of Welds (For the Pros or the Bold!)
Okay, confession time. Welding isn't for everyone. If your idea of DIY involves a screwdriver and a prayer, this might be the section you skim. But for those of you who have access to welding equipment, or are willing to hire a welder (which is often a smart move!), this is arguably the most robust and integrated way to join wood to steel. Essentially, you're creating a permanent, monolithic bond.
How it works: The most common approach here involves welding a piece of steel directly onto your existing steel frame. This "tab" or "bracket" then acts as a bridge. You drill holes into your wooden piece, align it with the welded tab, and then use screws or bolts to secure the wood to this new steel element. Sometimes, for smaller applications, you might even be able to weld small threaded studs directly to the steel frame, and then the wood can be bolted onto these.
Pros: Incredibly strong and permanent. This is the go-to for serious structural applications. It creates a seamless look and feels incredibly secure. Once it's done, it's done. Cons: Requires specialized equipment and expertise. Safety is paramount – you absolutely need proper protective gear and knowledge. Can be overkill for many applications. If you mess up a weld, it's a pain to fix. Not really a DIY-friendly option for beginners.
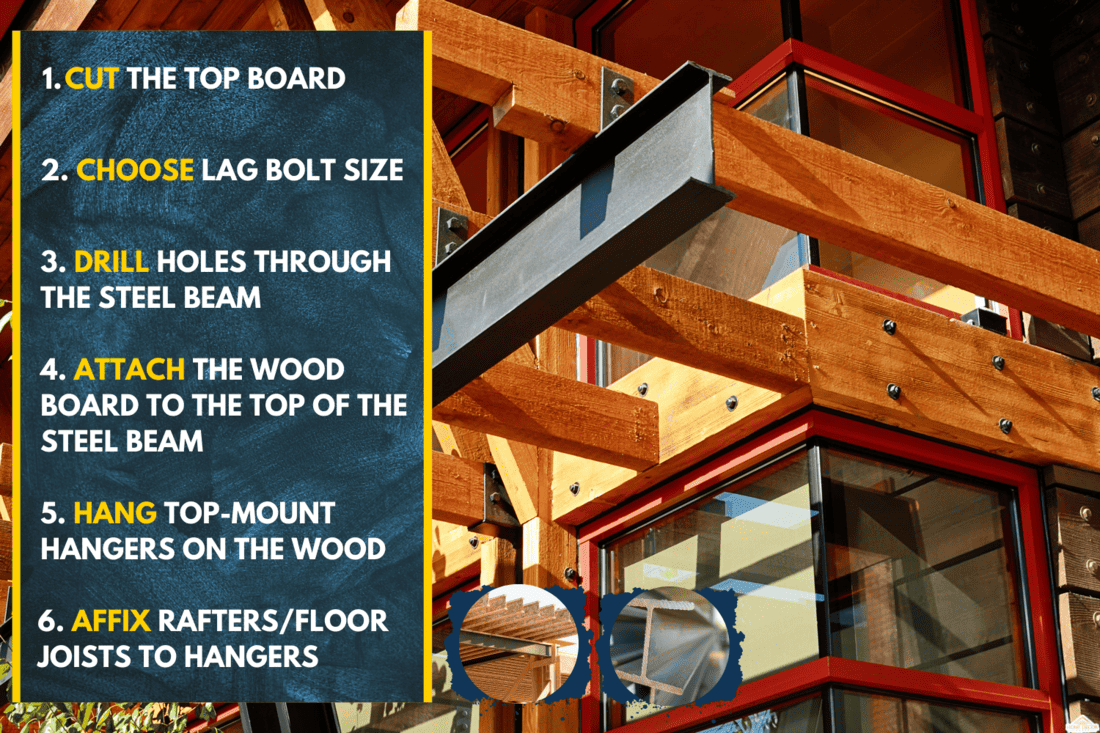
Method 2: The Dependable Duo: Bolts and Brackets
Now we’re talking! This is where most DIYers will find their happy place. Using bolts and specialized brackets is a fantastic way to achieve a strong and secure connection without needing a welding torch. It’s versatile, relatively straightforward, and can be adapted to a wide range of situations.
How it works: The core idea is to create an intermediary – a bracket that attaches to the steel frame and then provides a surface or holes to which the wood can be fastened. There are tons of off-the-shelf brackets available, or you can even fabricate simple ones from flat steel stock.
- L-brackets: These are your bread and butter. You'll screw or bolt the L-bracket to the steel frame (more on how to do that in a sec!) and then screw your wood piece directly into the other leg of the L-bracket.
- U-channels or C-channels: These can be used to create a groove or lip that the wood sits against or inside. You might then screw through the wood and into the channel, or use through-bolts.
- Custom-fabricated brackets: For more unique applications, you can design and have simple brackets made. This gives you ultimate flexibility.
Attaching the bracket to the steel: This is the crucial first step.
- Drilling and Bolting: If your steel frame is thick enough (and you've checked this!), you can drill holes directly through the steel. You'll then use bolts (carriage bolts are good for a clean look on one side) and nuts to secure the bracket. Make sure to use appropriate washers!
- Self-Tapping Screws (Tek Screws): For thinner gauge steel (like many stud frames), self-tapping screws are your friend. These special screws have a drill bit tip and effectively tap their own threads as they go into the steel. You'll need the correct type and size for your steel thickness. Always pre-drill a pilot hole, even with self-tappers, for a cleaner job.
- Cleats: Sometimes, you can create a wooden cleat that is attached to the steel, and then the main wooden piece is attached to the cleat. This is a bit like indirect fastening.
Attaching the wood to the bracket: Once the bracket is firmly attached to the steel, you’ll typically use wood screws. For a really strong connection, especially if the wood piece is substantial, you might even consider pre-drilling holes in the wood and using bolts that pass through the wood and into the bracket. Always use screws that are long enough to get a good bite into the bracket material but not so long that they poke out where you don't want them.
Pros: Very strong and versatile. Relatively easy to understand and execute. A wide range of readily available hardware. Can be disassembled if needed (unlike welding). A great balance of strength and DIY-friendliness. Cons: Can be visually apparent – the brackets and fasteners might be visible, which could be a pro or con depending on your aesthetic. Requires careful measurement and drilling.
Method 3: The Clever Screw: Direct Attachment with Specialized Fasteners
Sometimes, the simplest solutions are the best. For thinner wood pieces and lighter-duty applications, you might be able to screw directly into the steel frame. But, and this is a big but, you can't just grab any old screw.
How it works: This method relies on specialized screws designed to bite into metal.
- Self-Drilling Screws (Tek Screws): We touched on these earlier for attaching brackets, but they can also be used for direct wood-to-steel attachment if the wood is thin enough and the steel is appropriate. You’re essentially screwing directly through the wood and then into the steel frame. The screw drills its own hole and creates its own threads.
- Wood Screws with Pilot Holes in Steel: If you can drill a clean pilot hole into the steel frame first, a good quality wood screw might work for lighter applications. However, this is generally less secure than using a dedicated metal fastener. I’d only recommend this if you’re absolutely sure about the load and have tested it thoroughly.
Important Considerations:
- Steel Thickness: This method is best suited for thinner gauge steel, like that found in light-gauge steel studs. Thicker steel will be too tough for most direct screw applications without pre-drilling.
- Wood Thickness: The wood piece itself needs to be substantial enough to allow the screw threads to get a good grip. Thin veneer or thin plywood won't cut it.
- Pilot Holes: Even with self-drilling screws, drilling a pilot hole in the wood can prevent splitting and ensure a cleaner entry into the steel. For wood screws into pre-drilled steel, a pilot hole is essential.
- Screw Type: Use screws specifically designed for metal, often labeled as "metal screws" or "sheet metal screws." They have harder shanks and specific thread types.
Pros: Fast and straightforward for lighter applications. Minimal hardware needed. Can create a clean look if done neatly. Cons: Limited to lighter loads and thinner materials. Requires the right specialized fasteners. Risk of stripping the threads in the steel if not done carefully. Not ideal for heavy structural connections.
Method 4: The Adhesive Approach: Glue and Mechanical Fasteners
Sometimes, you want that super clean, fastener-free look on the wood side. This is where a combination of adhesives and strategically placed mechanical fasteners comes into play. It's about leveraging the best of both worlds – the holding power of glue and the structural integrity of screws or bolts.
How it works: You'll typically use a strong construction adhesive or epoxy to bond the wood to the steel. However, you cannot rely on glue alone for structural connections. Glue needs time to cure and can degrade over time or under stress. So, you’ll also incorporate mechanical fasteners (screws, bolts, or brackets) to hold the wood in place while the glue cures and to provide long-term stability.
![How To Attach Wood Framing To A Steel Beam [6 Steps To Follow]](https://homedecorbliss.com/wp-content/uploads/2021/05/engineered-wood-joists-on-a-steel-beam-in-a-house-under-construction-1024x683.jpg)
Steps:
- Prepare Surfaces: Thoroughly clean both the steel and wood surfaces. Degrease the steel.
- Apply Adhesive: Apply a generous bead of construction adhesive or epoxy to the back of the wood or the mating surface of the steel.
- Position and Fasten: Carefully position the wood and then immediately secure it with screws or bolts that go through the wood and into the steel frame (or into brackets attached to the steel). Clamp the wood firmly in place while the adhesive cures.
- Allow to Cure: Let the adhesive cure completely according to the manufacturer's instructions before putting any stress on the connection.
Pros: Can lead to a very clean aesthetic on the wood surface. Adds significant holding power to mechanical fasteners. Cons: Requires careful surface preparation. Glue alone is not a structural solution. You must use it in conjunction with mechanical fasteners for any significant load. Can be messy.
Important Considerations for a Successful Marriage
No matter which method you choose, there are a few universal truths that will make your wood-to-steel connections sing.
1. Know Your Steel
Seriously, this is the first step. Is it thick, structural steel? Or is it thin sheet metal studding? This will dictate whether you can drill and bolt, or if you need to use self-tapping screws. Don't guess – measure and research. If you're unsure, err on the side of caution and use a method that doesn't rely on puncturing the steel if you're not confident about its thickness or composition.
2. Pre-Drill, Pre-Drill, Pre-Drill!
This is the golden rule of woodworking and metalworking. Pre-drilling pilot holes in both the wood and the steel (where applicable) is crucial.
- For Wood: Prevents splitting, especially near edges, and makes driving screws easier.
- For Steel: Essential for drilling holes for bolts or for using self-tapping screws. It ensures a cleaner entry and reduces the risk of deforming the metal. Use a drill bit designed for metal and appropriate speed.
3. Choose the Right Fasteners
This can’t be stressed enough. Using wood screws in steel studs without a bracket is a recipe for disaster. Use screws specifically designed for metal when fastening to steel. Use strong wood screws for fastening wood to brackets. Consider the length, diameter, and type of head (e.g., pan head, hex head). Invest in good quality fasteners – they’re cheaper than fixing a failed connection.

4. Think About Expansion and Contraction
Wood moves. It expands and contracts with changes in humidity and temperature. Steel moves too, but usually to a lesser degree and in different ways. For large wood pieces attached to steel frames, especially in outdoor applications or where significant temperature fluctuations occur, you might need to account for this movement. Sometimes, this means using slotted holes in brackets to allow for slight shifts, or not overtightening everything to the point where the wood is completely constrained. For most indoor residential projects, this is less of a concern, but it's good to be aware of.
5. Don't Forget Washers!
Washers are your best friend, especially when bolting through steel. They distribute the load over a wider area, preventing the bolt head or nut from digging into the material. They also help to create a more secure and stable connection. Use them on both sides if necessary.
6. Consider Corrosion
If your project is going to be exposed to moisture or the elements, corrosion is a serious concern. Use galvanized or stainless steel fasteners and brackets. If you're painting your steel frame, ensure it's properly prepped and primed to prevent rust from wicking through.
Putting It All Together: A Quick Recap
So, to recap, attaching wood to a steel frame isn't some mystical art. It's about understanding the materials and using the right tools and techniques.
- For serious strength, welding a bracket is king, but not for the faint of heart.
- The most practical and common method involves using bolts and specialized brackets, screwing or bolting the bracket to the steel, and then screwing the wood to the bracket.
- For lighter duty, specialized self-drilling screws might do the trick.
- And for that super clean look, a combination of adhesive and mechanical fasteners is your best bet.
Always remember to prepare your surfaces, pre-drill, use the correct fasteners, and test your connection before putting it to the full test. Whether you're building a statement piece, a functional workspace, or just trying to stop Bartholomew from redecorating, a solid connection between wood and steel will ensure your creation stands tall and proud. Now go forth and build with confidence!