How To Build A Metal Storage Shed

So, you've hit that point. You know, the one where your garage looks like a mad scientist's garage sale, and your lawnmower is currently acting as a perch for a family of particularly adventurous squirrels. Yep, it's time to admit it: we've got too much stuff. And where does all this "stuff" tend to accumulate? Everywhere! From that overflowing junk drawer that could single-handedly launch a small country of spare batteries, to the garden tools that seem to reproduce faster than rabbits in springtime.
And then there's the lawnmower. Oh, the lawnmower. It’s probably got more personality than your Aunt Mildred after three glasses of sherry. It's seen better days, sure, but it's also seen your days, the days you actually managed to get the grass cut. Now it’s just… there. Taking up prime real estate. And let's not even get started on the bikes. Those are like metallic, two-wheeled teenagers, always leaning against something, demanding attention, and generally being a nuisance when you're trying to find the path to your actual car.
But fear not, fellow hoarders of the delightfully mundane! There's a solution, and it’s not just shoving everything into a bigger, more chaotic pile. We're talking about building a metal storage shed. Think of it as a grown-up’s fortress of solitude for your… well, for your stuff. No more playing Tetris with your garden hose and that ancient deflated kiddie pool. This is where organization meets its match.
Now, before you start picturing yourself as Bob the Builder, welding beams and wrestling with blueprints that look like secret government codes, let me reassure you. Building a metal storage shed is actually way more doable than you might think. It's less "epic construction project" and more "really well-organized IKEA furniture assembly, but for your backyard."
First things first, let’s talk about the why. Why a metal shed? Well, for starters, they're tougher than a two-dollar steak. They can handle whatever Mother Nature throws at them, from torrential downpours to that one rogue gust of wind that seems determined to redecorate your patio with your neighbor's prize-winning petunias. Plus, they’re relatively low-maintenance. No painting, no worrying about termites planning a buffet. Just a good, solid structure that’s going to keep your belongings safe and sound.
The other big perk? Space. Glorious, beautiful space. Imagine being able to walk into your shed and actually see the floor. It’s a concept so foreign it might as well be science fiction, right? You can finally give your trusty shovel a place of honor, instead of it being a tripping hazard that looks suspiciously like a medieval weapon. And that rake? It can finally stand up straight, proud, and not leaning precariously against your car door, threatening to leave an artistic scratch.
So, where do we begin this grand adventure of shed-dom? It all starts with a little bit of planning, which is basically adulting's way of saying "don't just wing it, you magnificent disaster."
The Great Shed Location Debate
This is where you become the ultimate backyard architect. Think of it as choosing the perfect spot for your picnic blanket. You want it to be convenient, right? You don't want to trek halfway across your property in your fluffy slippers just to grab a trowel. So, consider proximity to your house. But also, consider the aesthetics. Do you want your new metal palace to be the centerpiece of your garden, or tucked away like a secret hideaway?
And here’s a pro-tip, straight from the trenches of backyard DIY: make sure it's on level ground. Trust me on this. Trying to build a shed on a slope is like trying to balance a stack of Jenga blocks on a unicycle. It's possible, but it’s going to be a whole lot more stressful than it needs to be. A little leveling goes a long way. It’s like giving your shed a solid foundation, a firm handshake with the earth.
Also, think about drainage. You don't want your shed to become a miniature indoor swimming pool after a good rain. So, avoid low-lying areas that tend to collect water. Imagine your lawnmower doing a sad little float in the middle of your shed. Not ideal.
Choosing Your Shed's Persona
Now, let's talk about the actual shed. They come in all shapes and sizes, like a buffet of metal boxes. You've got your compact, no-nonsense models that are perfect for a few essential tools. Then you've got your sprawling estates, big enough to house your entire collection of questionable holiday decorations and maybe even a small, very patient llama.
When you're picking out your shed, consider what you're going to put in it. Are you a gardening guru with more shovels than fingers? Or are you someone who just needs a place to stash the kids’ bikes before they become permanent lawn ornaments? Measure your biggest items. Seriously, don't guess. You don't want to get your dream shed home only to discover your beloved, extra-wide wheelbarrow refuses to enter.
The material is also key. Most metal sheds are made of galvanized steel, which is basically steel that’s been dipped in zinc. This makes it super resistant to rust, which is like giving it a superhero cape against the elements.
The Foundation: More Than Just Fancy Footwork
Okay, so we've talked about leveling. But some sheds need a real foundation. Think of it as giving your shed a proper pair of concrete boots. This can range from a simple gravel base to a full-blown concrete slab.
A gravel base is often good enough for smaller sheds. It’s like a permeable welcome mat for your shed, allowing water to drain away. It’s relatively easy to install, mostly involving digging a bit, laying down some landscape fabric, and then filling it with gravel. Think of it as creating a nice, clean bed for your shed to sleep on.
A concrete slab is a bit more involved, but it offers the most stable and durable foundation. This is where things start to feel a bit more serious, like you’re truly building something to last. It involves forming the concrete, pouring it, and letting it cure. It’s a bit of a workout, but the reward is a shed that’s as solid as a rock.
Some kits come with their own pre-fab base systems too, which are like pre-packaged foundations. These can be a great option if you want to streamline the process and avoid the mess of mixing concrete. It’s like buying a pre-made cake mix – less fuss, and usually a pretty good result.
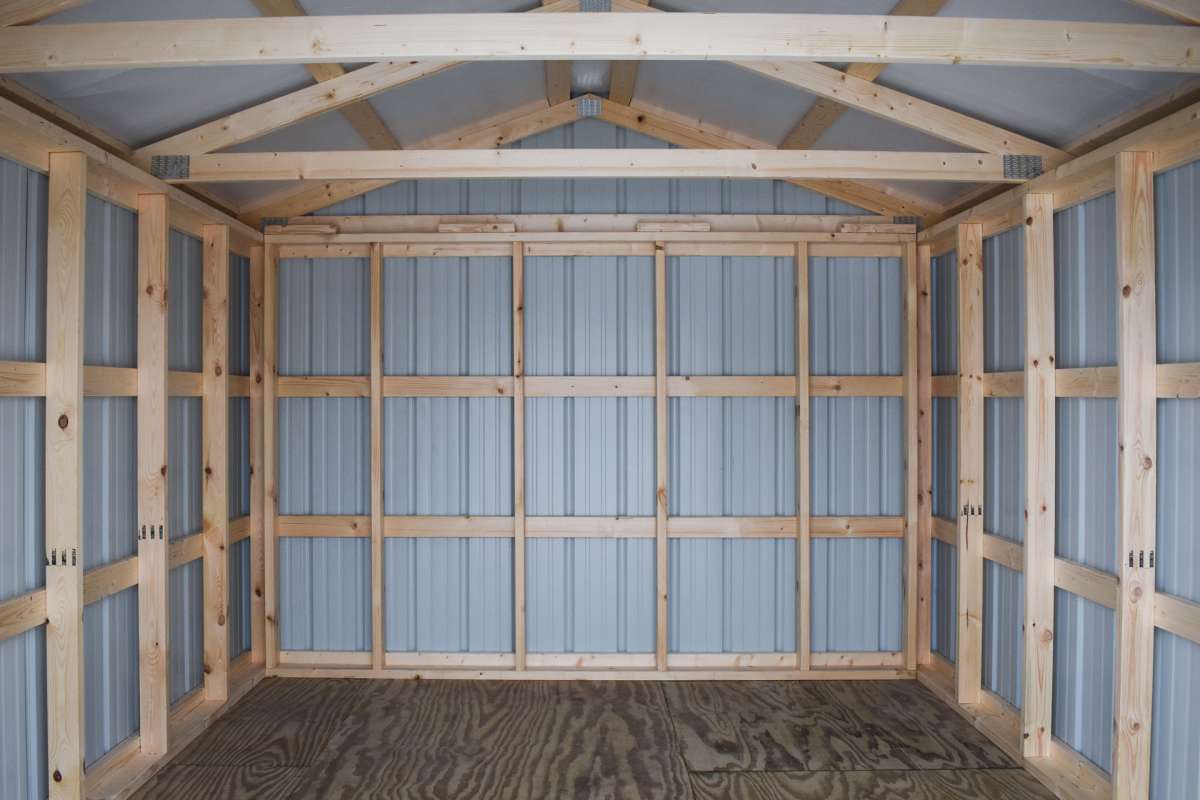
Unboxing the Dream: The Assembly Process
This is where the magic (and possibly a few choice words) happens. Most metal sheds come as kits. This means all the pieces are pre-cut and ready to go. Think of it as a giant, extremely important LEGO set for adults.
Your kit will come with instructions. And yes, you should read them. I know, I know, the instinct is to just start jamming pieces together, but trust me, these instructions are your roadmap to shed success. They’re usually pretty straightforward, with diagrams that are like little visual stories of how your shed will come to life.
You’ll likely need a few basic tools: a screwdriver, a wrench, maybe a drill. Nothing too fancy. It’s not like you’re going to need a jackhammer and a team of oxen. Just your average toolbox heroes.
The process usually involves assembling the walls first, then attaching them to the base. Then you’ll tackle the roof. It’s a bit like building a giant metal puzzle. You’ll be screwing, bolting, and generally piecing things together.
Don't be afraid to ask for help. If you have a friend who’s a bit more mechanically inclined, or a partner who enjoys a good collaborative challenge (or just likes seeing you sweat a little), enlist them. Two heads are better than one, especially when dealing with a piece of metal that’s trying to defy gravity. Plus, it’s a great excuse for some pizza and beers afterwards.
A common hurdle people run into is not having enough space to lay out all the pieces. So, before you start unboxing, make sure you have a clear area. Think of it as your construction staging ground. You don’t want to be tripping over panels while trying to find the right screw.
Also, be mindful of the weather. Trying to assemble a metal shed on a windy day is like trying to herd cats in a hurricane. Panels can fly, screws can go rogue. Pick a calm, clear day. Your future, well-organized self will thank you.
And here’s a little secret: sometimes, a piece might look like it fits, but it’s actually the wrong one. Don't force it. Take a breath, check the instructions again, and make sure you’ve got the right part. It’s better to be a little patient now than to have a wonky shed later that looks like it’s leaning in for a hug with your fence.
The Finishing Touches: Making it Yours
Once the basic structure is up, it's time for the fun part: making it your own! Many metal sheds come with doors and often a window or two. If yours doesn’t, you can often add them.
Consider shelving. This is where you can really take control of your space. Adjustable shelves are fantastic because they can grow and change with your needs. Imagine organizing your tools neatly, each with its own designated spot. It's like a professional organizer visited your shed.
Hooks are also your best friend. Hang your rakes, shovels, and hoses vertically. This frees up floor space and makes things super accessible. It’s like giving your tools a spa day where they get to hang out on the wall.
Lighting is another great addition. A simple battery-powered LED light can make a world of difference. No more fumbling around in the dark, trying to find that specific wrench you know is in there somewhere.
And if you're feeling fancy, you can even add some extra decorative touches. Some people paint the interior walls a cheerful color, or add a small workbench. It’s your space, after all! You can turn it into a mini-workshop, a potting station, or just the most organized storage haven you’ve ever seen.
The satisfaction of building your own metal storage shed is immense. You’ve taken chaos and tamed it. You’ve created order out of clutter. And the best part? You’ve done it yourself. So go ahead, admire your handiwork. You’ve earned it. Now, go fill it up with all that stuff you’ve been meaning to put away. Just try not to turn it back into the chaotic abyss you started with. Baby steps, right?