How To Build A Single Pitched Roof
Alright, gather 'round, you aspiring home heroes and DIY daredevils! Today, we're diving headfirst into the wonderful, slightly terrifying, yet ultimately rewarding world of building a single-pitched roof. Think of it as the roof equivalent of a really enthusiastic slide – it’s got one slope, and it’s ready for business. No fancy gables, no perplexing hips, just a straightforward incline designed to shed water like a duck’s back… or at least that’s the dream.
Now, before you picture yourself wrestling with lumber and shouting profanities at gravity (we’ve all been there, mate), let’s set the scene. Building a roof, even a simple one, is like performing a delicate dance with physics. You've got to be prepared, you've got to be precise, and you’ve got to have a healthy respect for heights. Remember that scene in a movie where someone is precariously balanced on a ladder? Yeah, try not to be that guy. Unless you're going for the "action hero" aesthetic, in which case, proceed with caution and maybe a stunt double.
So, why a single-pitched roof, you ask? Well, my friends, it's the unsung hero of simplicity. It’s elegant, it’s effective, and it’s surprisingly easy to explain. Imagine the simplest geometric shape that can keep the rain out. That’s basically it. It’s the minimalist approach to keeping your head dry, and who doesn’t love a good minimalist approach? It’s like a tiny architectural mantra: "One slope, less fuss."
The Blueprinting Ballet
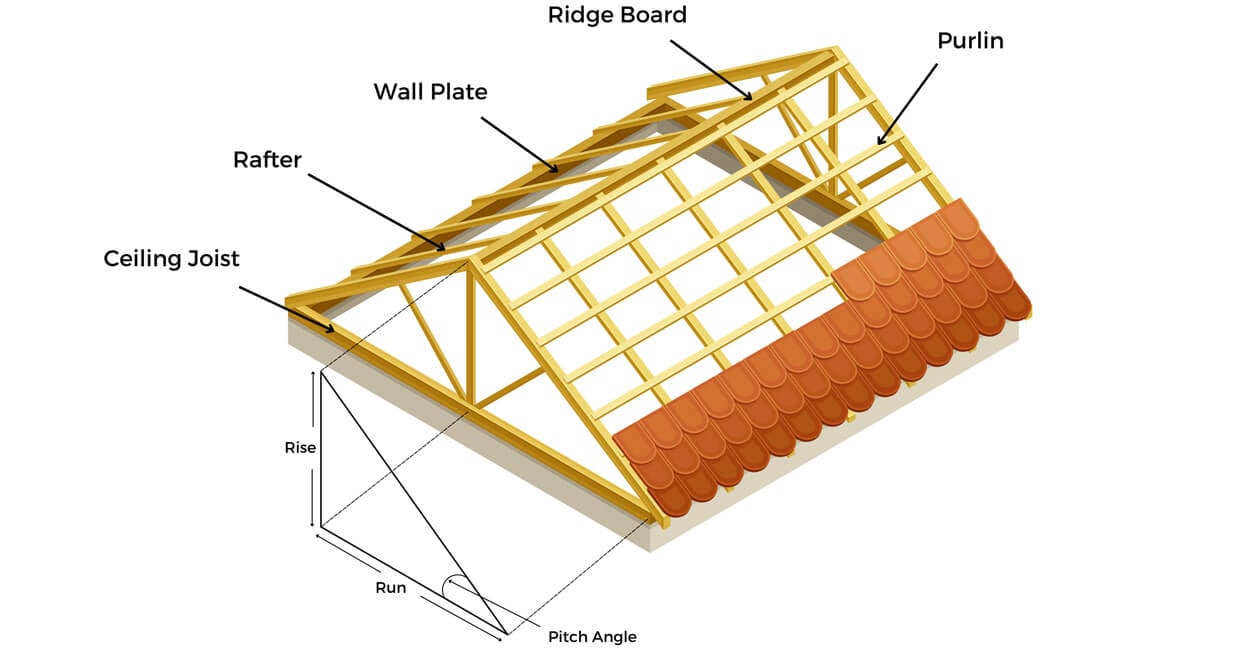
First things first, you can't just start hacking away at wood like a beaver on a caffeine binge. We need a plan! This is where your trusty blueprints come in. Think of them as the sacred scrolls of your roofing adventure. You’ll need to figure out the slope, also known as the pitch. This is crucial. Too flat, and you’ll have a personal swimming pool on your roof. Too steep, and it’ll look like your house is trying to escape. The recommended minimum slope for most roofing materials is usually around 1:12 (that's one inch of rise for every twelve inches of run). But always check your local building codes. They’re like the grumpy but wise elders of construction, and ignoring them is a recipe for disaster, or at the very least, a very stern talking-to from a building inspector who’s seen it all.
You’ll also need to determine the span of your roof – how far it needs to reach from one support to another. This dictates the size and strength of the lumber you’ll be using. Get this wrong, and your roof might decide to take a nap prematurely. And nobody wants a sleepy roof. Unless it's a roof with a built-in lullaby function, which, to my knowledge, hasn't been invented yet. Shame.

The Lumber Lament (and Love)
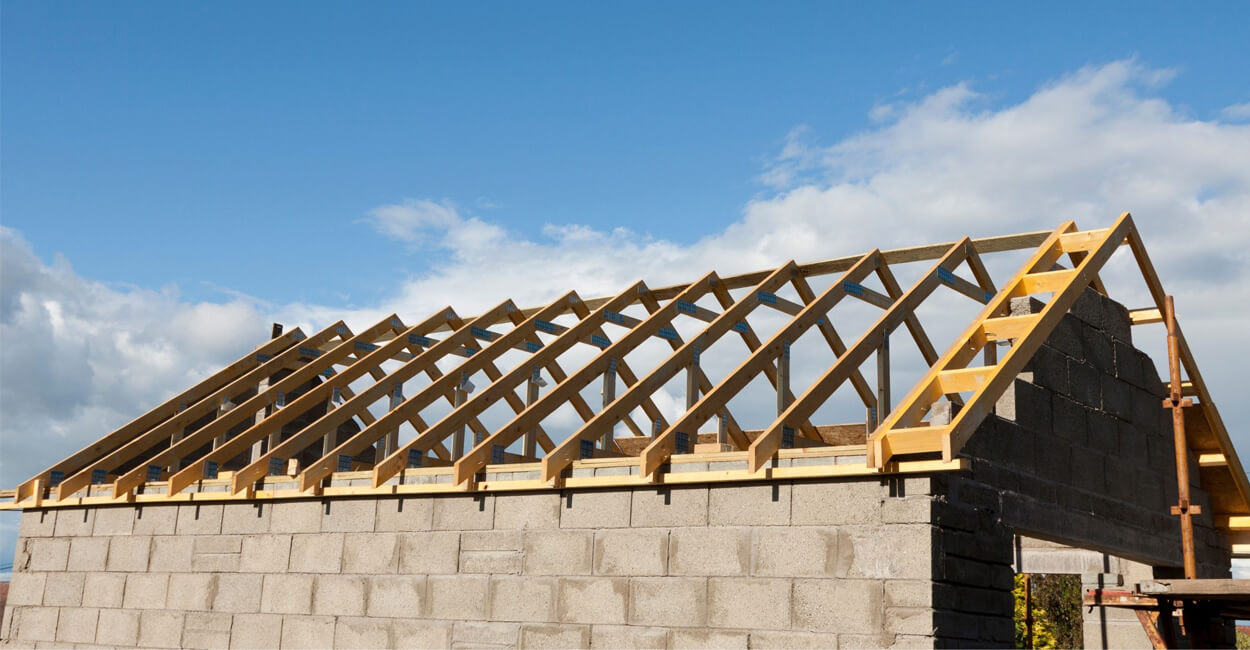
Now, let's talk timber. You'll need some robust beams, often called rafters. These are the backbone of your roof, holding up everything else. Imagine them as the strong, silent types of the construction world. They're essential, they don't complain much (unless you screw them up), and they're key to structural integrity. The size of your rafters will depend on your span and the loads they'll be carrying – that's snow, wind, the occasional rogue squirrel convention, you name it.
You’ll also need something called a ridge board (or a fascia board, depending on your design). This is where your rafters will meet at the highest point. Think of it as the happy little handshake at the top of your roof. And then there's the wall plate, which is what your rafters will sit on at the lower end, securely attached to your walls. It’s the foundation of your roof’s foundation, if that makes any sense. It’s like a hug for your rafters, but made of wood.
The Fascinating Framework
Okay, time for the fun part: assembly! You'll start by securing your wall plates to the top of your existing walls. Make sure they're level, because nobody likes a lopsided roof. Then, you'll mark out the positions for your rafters. Remember that slope we talked about? This is where it really comes into play. Each rafter will be cut at an angle to sit snugly against the wall plate and the ridge board. It's like solving a giant, wooden jigsaw puzzle, but with power tools and a higher risk of splinters.
You'll need to attach your rafters securely. This usually involves joist hangers, which are like metal little hugs that keep your rafters in place, and good old-fashioned screws or nails. Make sure everything is snug. A wobbly rafter is like a bad joke – it just doesn't hold up.
A surprising fact for you: the average house roof is made up of thousands of individual pieces. Think about that the next time you look up. It’s a miniature city of wood and shingles, all working together to protect you from the elements. It's a testament to human ingenuity, or at least our collective desire not to get rained on indoors.

Sheathing Secrets and Roofing Rhapsody
Once your rafters are in place and looking all structural and proud, it’s time to lay down the sheathing. This is typically done with plywood or OSB (Oriented Strand Board – fancy wood chips glued together). You're basically creating a solid surface for your roofing material to sit on. It’s like giving your roof a nice, smooth blanket. Lay these sheets down in a staggered pattern, like bricks, to give the whole thing extra strength. And for the love of all that is dry, make sure there are no big gaps. You don't want the pigeons staging a coup and nesting directly on your rafters, do you?
After the sheathing is on, it’s time for the real magic: the roofing itself. This could be asphalt shingles, metal roofing, or whatever tickles your fancy (and your budget). Follow the manufacturer's instructions to the letter. They know their stuff. A well-installed roof can last for decades. A poorly installed one? Well, let's just say you might be having a more intimate relationship with your attic insulation than you ever intended.
And there you have it! A single-pitched roof. It might not be as flashy as a mansard or as complicated as a gambrel, but it gets the job done with quiet dignity. So, go forth, my friends, build your roofs, and bask in the glory of knowing you’ve conquered a small piece of the sky. Just try not to fall off the ladder. That’s generally frowned upon in the DIY community.