
How To Install A Fluorescent Tube Light Bulb

Ready to banish the gloom and embrace the bright, beautiful world of fluorescent lighting? It’s easier than you think! Think of it like this: your old fluorescent tube is probably as tired as you are after a long day. It’s time for a refreshing, illuminating upgrade that will make your room feel brand new.
We’re talking about transforming your space from "meh" to "WOW!" with just a few simple steps. No need to be a certified genius or have a toolbox the size of a small car. This is a DIY adventure for the everyday hero, the person who likes to conquer minor household challenges with a smile.
So, let’s dive in and get those lights shining. It’s going to be a breeze, and you’ll feel like a true lighting wizard when you’re done. Get ready for applause (or at least a pat on your own back)!
Gather Your Gear: The Tools of Illumination
Before we embark on this epic quest, we need our trusty sidekicks. Think of these as your trusty steeds on the journey to brightness. First and foremost, you’ll need your brand spanking new fluorescent tube light bulb. Make sure it’s the right size and type for your fixture.
You might also want a sturdy step stool or a small ladder. We don’t want any daring tightrope acts over here, just a safe and comfortable reach. A little extra height is your friend when dealing with ceiling lights.
And for those tricky situations, a pair of gloves can be super handy. Fluorescent tubes can be a little slippery, and who wants to drop a brand new bulb? Plus, they keep your hands clean, which is always a bonus.
Safety First, Brightness Always!
Now, this is the most important part, and I’m going to shout it from the rooftops (or at least type it very, very loudly): TURN OFF THE POWER! Seriously, unplug it, flip the breaker, do whatever it takes to make sure the electricity is completely off. It’s like telling a superhero to take off their cape before a big fight.
This isn’t just a suggestion; it’s a sacred rule. We’re aiming for bright lights, not a bright flash followed by a trip to the emergency room. Your safety is more important than any light bulb, no matter how fancy it is.

Double-check! Give the light switch a flick to make sure the power is truly off. A little extra caution goes a long way in preventing any shocking surprises. We want to be energized by the new light, not by a rogue electrical current.
The Grand Old Exit: Removing the Old Bulb
Alright, with the power safely off, it’s time to say goodbye to our old, dim friend. Gently grasp the old fluorescent tube. Most of the time, they’re held in place by metal clips or sockets at either end.
You'll want to give it a slight twist and then pull it downwards. Imagine it’s like wiggling a stubborn carrot out of the ground. Don’t force it! If it feels stuck, re-examine how it’s attached.
Sometimes, you’ll need to push upwards slightly before twisting. It’s a little dance, a gentle persuasion. Once it’s free, carefully take it down.
A Moment of Reflection (and Disposal)
Before we welcome our new star, let’s consider the fallen soldier. Old fluorescent bulbs contain a tiny amount of mercury. It’s not enough to cause an apocalypse, but it’s best to dispose of them responsibly.
Check with your local recycling center or hazardous waste facility for proper disposal. Many hardware stores also have collection programs. We want to be good stewards of the planet, one bulb at a time.

So, treat it with respect, wrap it up if you can, and ensure it gets to the right place. Out with the old, and in with the new and improved!
The Grand Entrance: Installing the New Bulb
Now for the moment of truth! Take your shiny new fluorescent tube light bulb. Look at its pristine glory! It’s ready to illuminate your world.
Align the pins on the ends of the new bulb with the sockets in the fixture. It’s like putting puzzle pieces together, but much more rewarding. Make sure the pins are straight and ready to slide in.
Gently insert the pins into the sockets. Then, give the bulb a slight twist until it locks into place. You should feel a satisfying click, or at least a secure feeling.
A Twisting Tale of Triumph
The twist is crucial! Imagine you're screwing in a very long, very delicate screw. It’s not a forceful twist, but a deliberate one. You’re engaging the bulb with the electrical contacts.
Some fixtures might require a specific type of twist – a quarter turn, a half turn, or even a slight push and turn. Observe the old bulb’s position to get a clue if you’re unsure. The goal is a snug fit.
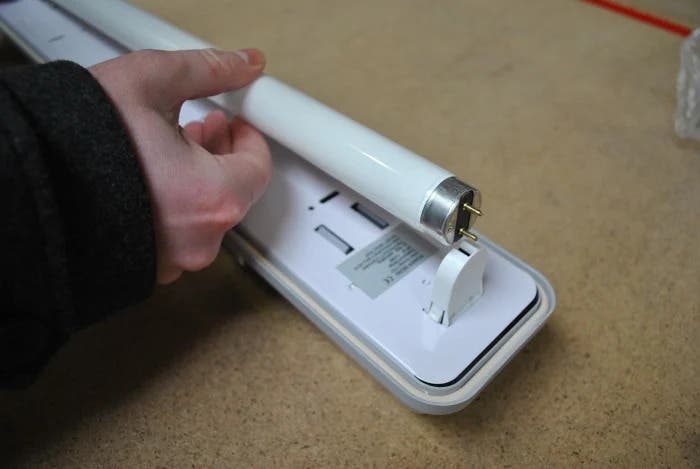
If you encounter resistance, don’t panic! Take a breath and try again. Sometimes, the pins might not be perfectly aligned. A little adjustment is all it needs.
The Glorious Return of Light!
You’ve done it! You’ve conquered the fluorescent tube installation. Now, it’s time for the grand reveal. Head back to the power source and flip that breaker or plug it in.
Hold your breath for a moment… and then BAM! Instant brightness! Watch as your room is bathed in a beautiful, new glow. It’s like magic, but it’s all thanks to your own brilliant efforts.
Marvel at your handiwork! You’ve successfully replaced a light bulb, a small act of domestic heroism that makes a big difference. Feel that surge of accomplishment!
Troubleshooting Tips: When the Light Doesn’t Ignite
Now, what if your new bulb doesn’t light up right away? Don’t despair! This is where our detective hats come on. The most common culprit is often a loose connection.
Double-check that the bulb is properly seated in the sockets. Give it another gentle twist. Sometimes, just reseating it can do the trick.

If it's still stubbornly dim, the issue might be with the ballast. The ballast is a little gizmo inside the fixture that helps regulate the power to the tube. If it’s old or faulty, it might need replacing, but that’s a slightly more involved project.
Another possibility is a bad new bulb. While rare, it can happen. If you suspect this, and you have another compatible bulb, try swapping it out.
And of course, always, always ensure the power is off before fiddling with anything inside the fixture. Safety first, remember?
The Joy of Illumination
See? That wasn't so scary, was it? You’ve just brought light back into your life, quite literally. It’s a small victory, but a mighty satisfying one.
Your room will feel brighter, more inviting, and just generally a happier place to be. Imagine all the amazing things you can do in this newfound brilliance! Reading that book you’ve been meaning to get to, finally seeing that dust bunny in the corner, or just enjoying the general awesomeness of a well-lit space.
So, go forth and conquer those lighting challenges! You are now a certified fluorescent tube installer, a beacon of brightness in your home. Give yourself a round of applause – you absolutely deserve it!