How To Make A Metal Mould
Hey there, fellow maker! So, you’re thinking about diving into the exciting world of metal molding, huh? That’s awesome! It might sound a bit intimidating at first, like something only wizards with blowtorches would do, but trust me, it's more accessible than you think. We're going to break down how to make a metal mold, and I promise, we'll keep it fun and relatively stress-free. Think of it as a cool DIY project with a super satisfying, metal-shaped reward at the end. No need to wear a full hazmat suit, although a good pair of safety glasses is definitely your new best friend. Let’s get this molten party started!
First off, what even IS a metal mold? Basically, it’s a hollow cavity, usually made of metal itself, that you pour molten material (like wax, resin, or even, yes, actual molten metal if you’re feeling brave and have the right gear) into. Once it cools and solidifies, you pop it out, and voilà! You have a perfect replica of your mold's shape. It’s like giving your creative ideas a shiny, metallic hug. Pretty neat, right?
Now, before we get our hands dirty (or, more accurately, our minds buzzing with possibilities), let's talk about what kind of mold you're aiming for. This is a crucial step because the method you choose will depend heavily on what you're trying to achieve. Are you making a small, intricate pendant for your favorite jewelry enthusiast? Or maybe you’re looking to cast a chunky, impressive door knocker that screams "welcome, but also, I have excellent taste"? The complexity and the material you’ll be casting will dictate your mold-making path.
For most beginners, and for the sake of keeping this article enjoyable and not a dissertation on metallurgy, we're going to focus on making molds for casting non-ferrous metals – think things like aluminum, zinc, or even pewter. These guys have lower melting points, making them much more manageable for us home-based artisans. Trying to cast steel? Yeah, that’s a whole other ballgame that involves furnaces that look like they belong on Mars and a whole lot of fire. Let’s save that for when you’ve got a few successful casts under your belt and a solid understanding of thermal dynamics. Baby steps, my friends!
The Two Main Flavors: Lost-Wax vs. Direct Metal Molds
When it comes to creating metal molds, there are two popular approaches, each with its own charm and set of challenges. Understanding these will help you pick the right one for your project. Don’t worry, we’ll keep it super simple, no confusing jargon here!
1. The "Lost-Wax" Method (Also known as Investment Casting)
This is the fancy-pants method, often used for intricate jewelry and detailed sculptures. The name itself is a bit of a giveaway, right? You create your desired shape out of wax. Then, you encase this wax model in a special, heat-resistant material (often a plaster-like substance called investment). Once the investment hardens, you heat it up to melt and “lose” the wax, leaving a hollow cavity in the shape of your original wax model. Then, you pour your molten metal into this hollow space. Pretty cool, huh?
Think of it like this: you sculpt your dream shape in a material that can be easily melted away. It's like building a sandcastle, then carefully removing the sand to reveal the space you want to fill. The beauty of lost-wax casting is its ability to capture incredibly fine details. If your wax model has tiny textures or sharp edges, the metal will faithfully reproduce them. This is why jewelers love it!
Pros of Lost-Wax:
- Incredible Detail: This is its superpower. If it’s in the wax, it’ll be in the metal.
- Complex Shapes: You can create all sorts of intricate and organic forms.
- Smooth Surface Finish: Often results in a very smooth finish, reducing post-casting work.
Cons of Lost-Wax:
- More Steps: It’s a multi-stage process, which means more time and potential for things to go… sideways.
- Materials Cost: The investment material and specialized waxes can add up.
- Mess Factor: Let's just say it can get a little dusty and… sticky.
For this article, while fascinating, the lost-wax method involves creating a wax model and then a mold around it. We’re focusing on making the metal mold itself, so we’ll touch on it, but our main focus will be on creating a more direct metal mold that you can reuse.
2. Direct Metal Molds (Sand Casting and Permanent Molds)
This is where we get to play with creating a mold out of metal, or at least preparing it to be filled with molten metal directly. This can involve using sand, or even machining two pieces of metal together to form a cavity.
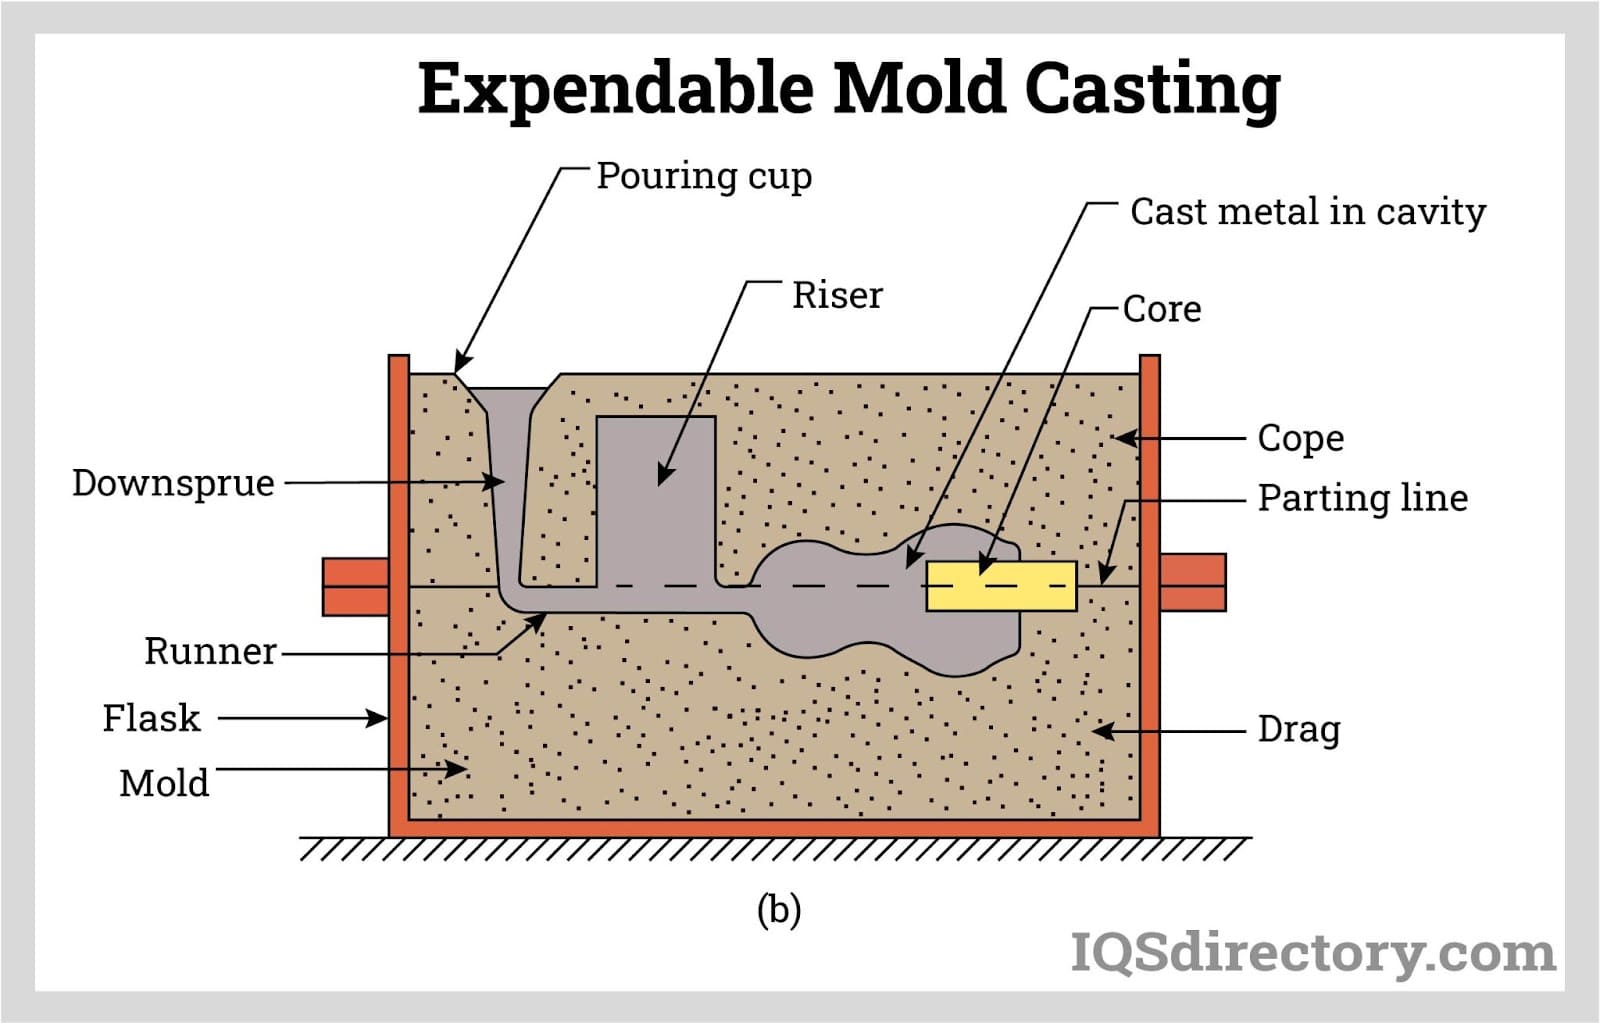
a) Sand Casting: This is a classic for a reason. You create your pattern (a replica of the object you want to cast) and then press it into a special kind of sand (foundry sand, not the stuff at the beach, which is way too fine and won't hold its shape). You usually need two halves of the mold, a “cope” and a “drag,” which are boxes that hold the sand. You pack the sand around your pattern, remove the pattern, and voilà – you have a cavity ready for molten metal! It’s surprisingly versatile and can handle larger objects.
Think of it as pressing your shape into a big block of play-doh, carefully lifting it out, and then pouring your liquid into the imprint. It's a bit more rustic, but incredibly effective!
b) Permanent Molds: This is where you create a mold from a more durable material, often metal itself (like steel or aluminum), that you can reuse over and over. You might machine two halves of a steel block with your desired cavity, or even use other techniques to create a reusable mold. Once heated, you pour your molten metal into this permanent mold. This is great for high-volume production or when you want a very consistent result.
Imagine having a cookie cutter that’s made of super-strong metal, and you can use it a thousand times to make perfect cookies (or, in our case, metal castings). That’s the idea behind permanent molds.
For our purposes, and to keep things manageable, we’re going to focus on a simplified version of creating a direct mold that you can reuse, or at least get a few good pours out of. We won’t be machining fancy steel blocks unless you happen to have a CNC mill in your garage (in which case, call me!). Instead, we’ll explore methods that are more accessible.
Getting Your Hands Dirty: Making a Simple Metal Mold
Alright, time for the nitty-gritty! Let's assume you're aiming to create a mold for casting something relatively small and not too complex. We'll focus on a method that uses readily available materials and techniques.

Step 1: The Master Piece – What Do You Want to Cast?
This is your master pattern. It’s the object you want to make a mold of. It can be made of wood, plastic, even a 3D printed object. For a beginner, starting with something simple is key. Think a basic geometric shape, a small figurine, or even a key. The smoother and more detailed your master pattern is, the better your final casting will be. If your master has rough edges, your mold will capture those rough edges, and your casting will too. So, clean it up!
Important Note: Make sure your master pattern is not porous. If it has holes or will absorb moisture, it can cause issues later. Also, ensure it can withstand the temperatures of the molding material you’ll be using. For most basic metal casting with aluminum or pewter, your master should be fine, but if you’re unsure, do a little research.
Step 2: Choosing Your Mold Material – Let’s Talk About the "Stuff"
This is where things get interesting. For reusable or semi-reusable molds, you have a few options:
- Graphite Blocks: These are a metalcaster's dream for small, repeatable parts. Graphite is heat-resistant, easy to machine, and doesn't react with most molten metals. You can buy graphite blocks and carve your mold cavity into them. Think of it as carving into a very hard, very special type of stone. It’s a bit more advanced, but the results are fantastic for high-volume work.
- High-Temperature RTV Silicone: This is a more accessible option for smaller, less complex molds. You pour a special liquid silicone around your master pattern, let it cure, and then you have a flexible, heat-resistant mold. While technically not a metal mold, it can cast lower-melting-point metals like pewter and some aluminum alloys. The silicone mold itself will eventually degrade, but you can get multiple pours from it.
- Plaster/Refractory Compounds: Similar to the investment material used in lost-wax, you can create more robust, single-use molds with specialized plaster mixes. These are often used for sand casting where you're not aiming for a permanent mold, but a mold for a single pour.
For this guide, let’s lean towards a method that gives you a reusable mold without needing a full machine shop. We’ll discuss a simplified approach using graphite or a very robust high-temperature RTV silicone.
Step 3: Creating the Mold Cavity – Carving and Shaping
This is where the magic happens!
Option A: The Graphite Grinder (Simplified)
If you've opted for graphite blocks, this is where you'll need some tools. Think Dremel tool, die grinder, or even specialized graphite carving tools. You'll be carefully carving out the shape of your master pattern into the graphite. This requires patience and a steady hand.
Key things to remember with graphite:

- Work in sections. Don't try to carve the whole thing at once.
- Use appropriate safety gear. Graphite dust can be messy and irritating. A good respirator mask is essential.
- Make two halves! Most molds need to be opened to remove the cast. So, you'll carve half your shape into one block, and the other half into another. Ensure these two halves fit together perfectly. You might want to add registration pins to help align them.
- Consider a sprue and vent. A sprue is the channel where you’ll pour your molten metal. A vent is a small channel that allows air to escape as the metal fills the mold, preventing bubbles and defects. These are crucial for a good pour.
It might sound like a lot, but visualize it. You’re creating a little metal-shaped house within a block of graphite. When the molten metal flows in, it fills up this house and takes its shape.
Option B: The Silicone Smoother (Easier Entry)
If you’re going the RTV silicone route, it’s a bit more like… well, making jello. You'll need a container to act as the outer shell of your mold, and your master pattern.
- Secure your master pattern: Place your master pattern in the bottom of your container. You might need to use some clay or a sticky substance to hold it in place.
- Create a mold box: This is usually a container (like a plastic tub or a custom-made box) that will hold your silicone. Make sure it's sealed well so the liquid silicone doesn't leak out.
- Prepare your silicone: Follow the manufacturer's instructions exactly. These two-part silicones need to be mixed in precise ratios. Get this wrong, and it won’t cure properly.
- Pour the silicone: Slowly pour the mixed silicone over your master pattern, ensuring it covers it completely. Try to pour in a way that minimizes air bubbles. You can also use a vacuum chamber to degas the silicone for an even better result, but for a beginner, careful pouring might suffice.
- Let it cure: Patience, grasshopper! Let the silicone cure for the time specified by the manufacturer. This is not the time to rush.
- Demolding: Once cured, carefully remove your master pattern from the silicone. If you’ve designed your mold box correctly, you should have a flexible mold with a perfect imprint of your master.
- Cutting the sprue and vents: Similar to graphite, you’ll need to cut a channel (sprue) for pouring and small channels (vents) for air escape. You can do this with a sharp craft knife or a small drill bit.
This method is fantastic for creating multiple identical molds from one master, or for casting softer metals. The silicone mold acts as a temporary container, but it allows you to get that metal casting!
Step 4: Pouring the Molten Metal – The Fiery Finale!
Disclaimer: This is the most dangerous part! Working with molten metal requires extreme caution, proper safety equipment, and a good understanding of the materials you're using. If you’re new to this, please, please seek guidance from experienced individuals or find resources specific to the metal you’re working with. Do not attempt this without understanding the risks.
Assuming you've got your setup and safety gear (heat-resistant gloves, apron, face shield, safety glasses, sturdy shoes – no open-toed footwear!), you'll need a way to melt your metal. For lower melting point metals like pewter, a simple propane torch can sometimes suffice for small amounts, but a proper crucible and furnace are recommended for consistency and safety. For aluminum, you'll definitely need a furnace.
Once your metal is molten and at the correct temperature, you'll carefully pour it into your prepared mold. This is where those sprue and vent channels come into play. The metal flows in, fills the cavity, and then you wait.
The waiting is actually part of the fun! It's the anticipation of seeing what you've created. You'll need to let the metal cool completely before attempting to open the mold and reveal your masterpiece.

Step 5: The Big Reveal!
With bated breath, you’ll carefully open your mold. If all has gone well, you’ll be greeted with a perfect, metal replica of your master pattern! It might have some flashing (extra bits of metal) that you’ll need to clean up with files or sandpaper, but the core shape should be there.
Congratulations! You've just made a metal mold and cast something awesome. That’s a seriously cool achievement.
A Little Something Extra: Considerations and Tips
Safety First, Always: I cannot stress this enough. Molten metal is no joke. Always wear your safety gear, work in a well-ventilated area, and have a fire extinguisher rated for metal fires nearby. If you’re unsure about anything, stop and ask for help.
Start Small: Don't try to cast a life-sized statue on your first go. Begin with simple shapes and smaller pieces. Get a feel for the process before tackling bigger, more ambitious projects.
Know Your Metal: Different metals have different melting points, densities, and shrinkage rates. Researching the specific metal you plan to cast is essential.
Practice Makes… Well, More Castings: Your first few attempts might not be perfect. That’s okay! Every pour is a learning experience. Analyze what went wrong and adjust your technique for the next time.
Don't Be Afraid to Experiment: Once you've got the basics down, you can start playing with different mold materials, master patterns, and even metal alloys. The world of casting is vast and full of possibilities!
Making a metal mold might seem like a daunting task, but with a bit of research, the right tools, and a healthy dose of caution, it’s a wonderfully rewarding hobby. The feeling of taking something from a concept in your head to a solid, tangible object in metal is truly exhilarating. It's a connection to ancient crafts, a testament to human ingenuity, and a fantastic way to bring your creative visions to life. So go forth, get inspired, and start making! You've got this, and the world is ready for your metallic creations!