How To Make Threads In Metal
I remember the first time I ever encountered a stripped screw. It was a tiny, almost insignificant thing, holding together the back of a vintage radio I was trying to lovingly restore. My grand plan involved a delicate touch, a whisper of a screwdriver, and a triumphant reassembly. Instead, I got… well, a stubborn, unyielding metal stump that refused to budge. It was infuriating! I tried every trick in the book – rubber bands, pliers, even a bit of brute force that probably made the radio’s original maker weep. Nothing. It was in that moment of utter defeat, staring at this tiny, metal insult, that I started to appreciate the magic of… well, of threads.
Threads. You see them everywhere, don't you? Holding your furniture together, making your water faucet work, even allowing you to open that pesky jar of pickles. They’re the unsung heroes of the mechanical world, the silent connectors that make so much of our modern life possible. And while it might seem like something reserved for the wizards in workshops or the folks who wear safety goggles as a fashion statement, making threads in metal is actually a surprisingly accessible skill. And hey, if I can learn it (and trust me, my mechanical aptitude used to be about as sharp as a butter knife), then so can you!
So, how exactly do we go from a plain, unassuming piece of metal rod to something with those beautiful, spiraling grooves that grip and hold? It’s all about subtracting material in a very precise, very intentional way. Think of it like sculpting, but instead of removing chunks to reveal a statue, you're removing slivers to create a functional connection. It’s a dance between the tool and the workpiece, a symphony of metal and machinery. And it’s pretty darn cool.
The Two Main Ways to Go: Cutting and Rolling
When we talk about making threads in metal, there are generally two big players in town: thread cutting and thread rolling. Each has its own vibe, its own strengths, and its own ideal scenarios. You wouldn't use a sledgehammer to crack a walnut, right? Same principle applies here. Let’s break them down.
Thread Cutting: The Traditional Artisan
This is probably what most people picture when they think of making threads. It's the classic, time-tested method. Think of a lathe – that spinning metal magician – and a sharp cutting tool that carves out the threads. It’s precise, it’s versatile, and it’s a fantastic way to learn the fundamentals.
The most common tools for thread cutting are dies and taps. Ever seen a little round thing with slots in it? That’s probably a die. And the tool that looks like a screw with cutting edges? That’s a tap. They’re like the specialized knives for metal threading.
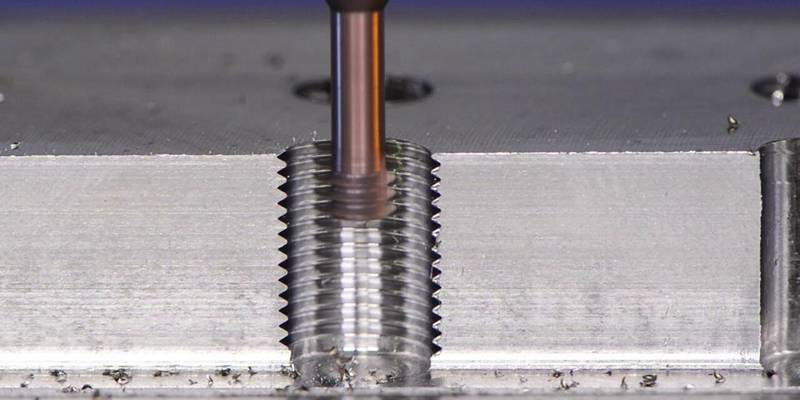
Using Dies: For the Outside Job
Dies are for when you need to create threads on the outside of a rod or bolt. Imagine you have a plain metal rod, and you want to turn it into a bolt you can screw into something. That's where a die comes in. You’ll typically use a die holder, which is basically a handle that holds the die securely. You then mount your metal rod – often in a vise or, if you're feeling fancy, a lathe. With a bit of cutting fluid (think of it as lubricant for the metal’s workout), you start turning the die onto the rod.
It’s not a race! You’ll want to turn the die a bit, then back it off to clear out the metal shavings. This prevents the die from getting jammed and ensures a cleaner thread. You're essentially guiding the die as it "cuts" its way down the rod, creating those familiar helical grooves. It takes a bit of feel, a bit of patience, and a healthy dose of elbow grease. And sometimes, especially with harder metals, you might feel like you're wrestling a very stubborn, very metallic octopus. But the satisfaction of seeing those clean threads emerge is chef's kiss.
The beauty of dies is their versatility. You can buy them in a massive range of sizes and thread pitches, from the tiny, delicate threads on your eyeglasses to the beefy ones on construction equipment. You can even get adjustable dies, which allow you to fine-tune the thread’s tightness. Handy, right?
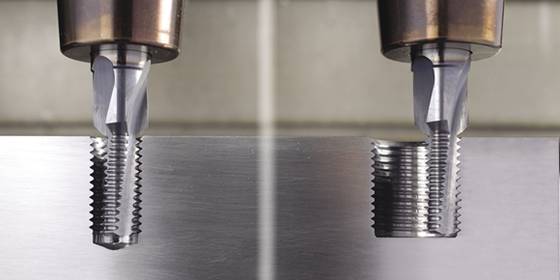
Using Taps: For the Inside Job
Now, what if you need to create threads inside a hole? Like, you want to make a threaded hole in a block of metal so you can screw a bolt into it? That's where taps come into play. They're the male counterparts to the female threads you're creating. Similar to dies, you’ll use a tap wrench to hold the tap.
The process is similar: you start by drilling a pilot hole. The size of this hole is crucial – too small and you’ll struggle to tap; too big and you won’t have enough material to form the threads. Then, with more cutting fluid, you carefully insert the tap into the hole and begin to turn. Again, it’s all about applying steady pressure and backing off periodically to clear the metal chips.

Tapping can feel a little more… precarious than using a die. There’s a higher chance of breaking a tap if you force it or don’t keep it straight. And let me tell you, a broken tap stuck inside a hole is the metalworking equivalent of a dental emergency. It’s a nightmare to get out. So, patience and a gentle touch are your best friends here. Imagine you're whispering sweet metal nothings to the hole; that's the kind of finesse you're aiming for.
Taps also come in sets, often starting with a taper tap (which has a gentle lead-in), followed by a plug tap (which is straighter), and finally a bottoming tap (which can create threads all the way to the bottom of a blind hole). Using the whole set ensures you get a clean, well-formed thread. It's like a multi-stage recipe for thread perfection.
Pro tip for aspiring thread-makers: Always, always, always use cutting fluid! It lubricates the cutting edges, cools the metal, and helps to flush out chips. Skipping this step is like trying to run a marathon without water – you’re going to have a bad time.
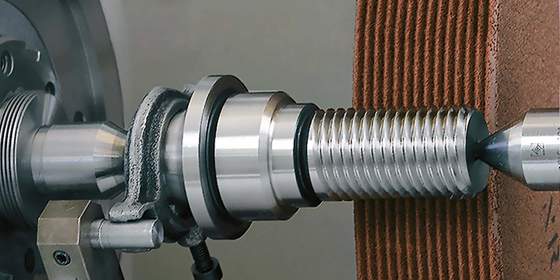
Thread Rolling: The High-Speed Impressionist
Now, let’s talk about the other kid on the block: thread rolling. This method is less about cutting and more about… well, rolling. Instead of removing material, thread rolling tools deform the metal to create the threads. Think of it like pressing a pattern into soft clay, but with much, much harder stuff. It’s faster, it’s more efficient for mass production, and it results in stronger threads.
How does it work? You’ve got specialized dies, often with hardened rollers or dies that have the negative form of the thread on them. When you apply pressure to a blank rod, these tools literally push and displace the metal, forming the helical grooves without removing any material. Pretty wild, right?

The big advantage of thread rolling is that it actually strengthens the workpiece. By deforming the metal in a controlled way, you create a grain structure that is more resistant to fatigue and breakage. For critical applications where strength is paramount, thread rolling is often the preferred method. Plus, it’s super fast. Imagine turning out hundreds, even thousands, of threaded parts an hour. That’s the power of thread rolling.
The downside? It’s a bit less forgiving than cutting. You need to have the right material hardness and a very precise blank diameter for it to work effectively. It’s also typically done with specialized machinery, like thread rolling machines or even in stamping presses, rather than the handheld dies and taps you’d use for cutting.
So, while you might not be setting up a thread rolling operation in your garage (unless you’re incredibly ambitious!), it’s good to know this alternative exists. It’s the industrial heavyweight champion of thread making.
What You'll Need (Besides Courage and Coffee)
Okay, so you're thinking, "This sounds doable. What do I actually need to get started?" Well, it depends on your ambition and your budget, but here’s a general rundown:
- The Metal: Duh! You need something to thread. For beginners, something like mild steel or aluminum is a good bet. They’re relatively soft and forgiving.
- Cutting Tools: This means your taps and dies. You can buy individual sizes or sets. A good starter set for common bolt sizes (like M6, M8, M10 for metric, or 1/4", 5/16", 3/8" for imperial) is a solid investment.
- Holders/Wrenches: You’ll need a tap wrench for your taps and a die stock (or die holder) for your dies.
- Vise: A sturdy vise is essential for holding your workpiece securely while you work.
- Drill: For tapping, you’ll need a drill to create the pilot hole.
- Cutting Fluid: Seriously, don’t skip this.
- Measuring Tools: A ruler or caliper can be helpful for checking your work.
- Safety Gear: Safety glasses are non-negotiable. Gloves are also a good idea. Metal shavings can be sharp!
If you’re lucky enough to have access to a lathe, that opens up a whole new world of precision threading. You can use a dedicated threading tool bit and dial in your settings for incredibly accurate results. But for most DIY folks, taps and dies are the way to go.
A Word on Thread Types
Just a quick note: there are tons of different thread types out there. You'll hear terms like UNC (Unified National Coarse), UNF (Unified National Fine), Metric threads, ACME threads, pipe threads, and so on. For general-purpose work, UNC and Metric are what you'll encounter most often. Coarse threads are generally easier to cut and are great for quick assembly, while fine threads offer more precise adjustment and are stronger.
When you buy taps and dies, make sure they match the thread type you need! Mixing and matching will lead to… well, frustration. And possibly some very odd-looking, non-functional metal bits.
The Final Word (For Now)
Making threads in metal might seem daunting at first, but it's a skill that's both practical and incredibly rewarding. It’s about transforming a simple piece of metal into something functional, something that connects, something that holds. Whether you’re fixing that stripped screw that started this whole journey, creating custom hardware for a project, or just exploring the satisfying world of metalworking, learning to make threads is a fantastic step.
So, grab some tools, get a piece of metal, and give it a whirl. Be patient, be precise, and don’t be afraid to get a little bit of metal dust on your hands. You might just surprise yourself with what you can create. And who knows, maybe you’ll finally be able to open that jar of pickles with confidence!