How To Set Up A Fishing Rod For Lake Fishing
I remember my first “serious” fishing trip. By serious, I mean I’d watched enough YouTube videos to think I was practically an expert, and my dad had grudgingly agreed to take me to a decent-sized lake. We’d driven for what felt like ages, the air thick with anticipation and the faint, exciting scent of, well, lake. I’d packed all my gear with meticulous care: a brand-new, gleaming fishing rod, a tackle box bursting with lures that shimmered like tiny, irresistible jewels, and a bucket that I envisioned overflowing with my magnificent catches. The problem? When it came time to actually fish, I stared at my rod like it was some alien artifact. I’d assembled it… I think? But attaching the line, tying a knot that wouldn’t immediately unravel in the face of a determined minnow, and getting the reel to behave felt like trying to solve a Rubik's Cube blindfolded. My dad, bless his patient soul, spent a good twenty minutes patiently untangling my masterpiece of a bird's nest, all while I tried to look like I totally knew what I was doing. Let’s just say the fish were safe from me that day. The real catch was the lesson learned: setting up your fishing rod properly is, like, super important. And not as complicated as it feels when you’re staring down a spool of line for the first time.
So, if you’ve ever felt that same pang of "what am I even doing?" as you stare at your new rod, or if you’re just looking to refine your technique, you’ve landed in the right spot. We're going to break down how to set up your fishing rod for lake fishing, step-by-step. No fancy jargon, just practical advice from someone who’s been there, fumbled with the line, and eventually, started catching things. Okay, maybe not a ton of things at first, but hey, progress!
Unboxing Your Awesome Rod and Reel
First things first, let’s get acquainted with your new best friends: the rod and the reel. They’re usually sold separately, but sometimes you'll find them as a combo. If you got them separately, don't sweat it! They're designed to work together. Think of the rod as the arm that casts the line, and the reel as the handy gadget that stores and dispenses that line. Pretty neat, right?
Assembling Your Rod
Most modern fishing rods are designed to be "two-piece" or "multi-piece." This just means they come in sections that you connect. Why? Because it makes them way easier to transport. Nobody wants to wrestle a full-length fishing rod into the back of their car, trust me. You'll have a butt section (the handle end) and one or more tip sections. Simply line up the guides (those little metal rings on the rod) and push the sections together firmly. You'll feel a slight 'click' or a snug fit when they're properly connected. Make sure they are really snug. A loose connection can break and ruin your day, or worse, your rod.
Some higher-end rods might have a slightly different connection mechanism, but for most beginner and intermediate rods, it's a straightforward push-and-fit. If you're unsure, check the manufacturer's instructions. They’re usually pretty good about making these things intuitive. And hey, if you’ve got a one-piece rod, congratulations! You’ve skipped a step, but don't get smug. There’s plenty more fun (and potential fumbling) ahead!
Mounting the Reel: A Match Made in Fishing Heaven
Now for the reel. It’s the heart of your setup, responsible for getting that line out there and bringing your prize back. You’ll see a part of the rod that looks a bit like a raised collar or two metal feet – that’s the reel seat. Most spinning reels (the most common type for beginners) have two "foot" components that slide into the reel seat. You’ll usually find a locking mechanism on the reel seat, often a screw-down collar or a clip. Loosen this mechanism, slide the reel’s feet into the seat, position it where it feels comfortable (usually with the handle on the right if you're right-handed, or left if you're left-handed – we'll get to that!), and then tighten the locking mechanism. Give it a gentle wiggle to make sure it's secure. You don't want your reel falling off mid-cast, do you? I mean, I've never done that. Nope. Never.
One of the coolest things about reels is their versatility. Most spinning reels allow you to switch the handle side. If you're right-handed but prefer to reel with your left hand (which many experienced anglers do for better control), you can usually reconfigure this. It might involve a small screwdriver and a bit of fiddling, but it’s totally doable. Don't be afraid to experiment with what feels natural for you. This is your fishing journey, embrace it!
The Big One: Spooling Your Reel with Line
Ah, the fishing line. This is where the magic (and potential frustration) really happens. You'll likely have a spool of monofilament, fluorocarbon, or braided line. For lake fishing, especially if you're starting out, monofilament is a solid, forgiving choice. It’s stretchy, which helps absorb shock from a fighting fish, and it’s generally more affordable. Braided line is super strong and has virtually no stretch, great for detecting subtle bites, but can be a bit trickier for beginners. Fluorocarbon is strong, sinks well, and is nearly invisible underwater, but it can be stiffer.
First, you need to attach the line to the reel. Look at your reel's spool. You'll see a small hole or a clip. Tie your line securely to this. A good, strong knot is crucial here. The Arbor Knot is your best friend for monofilament and fluorocarbon. If you're using braid, an Improved Albright Knot or a Spider Hitch works wonders. Don’t just tie a granny knot and hope for the best, okay? Your fish will thank you.

Now, here's the fun part: winding the line onto the spool. This is where that spinning reel handle comes into play. Open the bail (that wire arm on the reel) and let the line hang loosely. Then, start turning the handle. You want to wind the line on evenly and with moderate tension. Don't wind it too tight, or it can dig into itself and cause tangles. Conversely, don't wind it too loosely either, as that can lead to slack and potential line twist.
You’ll want to fill the spool almost to the top, leaving about a 1/8 inch gap. If you overfill it, the line will spill off and create a mess. If you underfill it, you won’t have enough line for a decent cast. Imagine casting out, and your line runs out halfway! Disaster. The goal is a smooth, even layer of line. Some people use a pencil or a dowel rod to help rotate the line spool as they wind onto the reel spool. This keeps the line from "unspooling" itself and helps maintain consistent tension. Ingenious, right?
Pro Tip (from someone who has learned the hard way): If you're using a fresh spool of line, try to unwind it off the spool in the same direction it was originally wound. This helps prevent line twist, which is the bane of every angler's existence. Sometimes, it’s easier to have a friend help you with this, or you can even get a line spooling station. But for a quick setup, just be mindful of that direction!

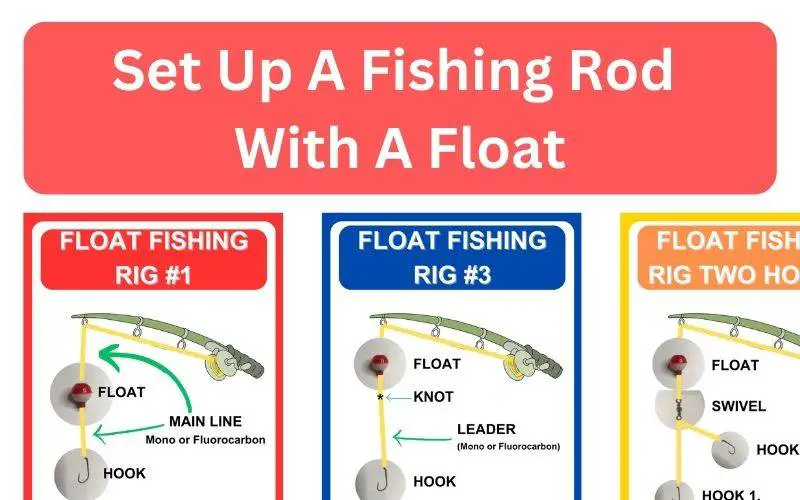
Attaching Your Leader and Lure: The Business End
You've got your line on the reel, and it's looking good. Now, what do you tie to the end of that line? This is where your lure or bait comes in. For many lake fishing situations, you might want to use a leader. A leader is a short piece of line, often made of fluorocarbon, that's tied to the end of your main fishing line. Why use a leader? Well, if you're fishing with monofilament as your main line and you're targeting fish with sharp teeth (like pike or walleye), a leader can prevent them from biting through your line. Fluorocarbon leaders are also less visible underwater, which can be a real advantage.
You'll need a knot that's strong enough to connect your main line to your leader, and then another knot to connect your lure to your leader (or directly to your main line if you're not using a leader). For connecting two lines of different diameters (like your main line and a leader), the Surgeon's Knot is a reliable choice. It’s relatively simple and very effective.
Once your leader is attached, it’s time for the lure. There are hundreds of different fishing knots out there, but for simplicity and strength, the Improved Clinch Knot is a classic for a reason. It's easy to learn and holds up well. You pass the line through the eye of the hook or lure, loop it around the standing line seven or eight times, pass the tag end back through the loop you just made near the hook eye, and then pass it through the larger loop that’s formed. Moisten the knot with a bit of saliva (yes, really!) and pull it tight. Trim off the excess line, leaving a short tag end.

Curious about different knots? Totally! The Palomar knot is another fantastic, super-strong knot that's great for braided line and is surprisingly easy to tie once you get the hang of it. Google it, watch a quick video, and practice. Having a few reliable knots in your arsenal will make you feel like a fishing ninja.
Putting It All Together: The Final Checks
You're almost there! You've got your rod assembled, reel mounted, line spooled, and lure tied on. Now for some final checks:
- Check Your Guides: Make sure all the guides on your rod are clean and free of any damage. A nicked guide can fray your fishing line.
- Test Your Drag: Your drag is that mechanism on your reel that allows line to be pulled out under tension, preventing your line from breaking when a fish pulls hard. You want it set so that when a decent amount of pressure is applied, line starts to peel off the spool. It’s better to have it set a bit looser when you’re starting out, you can always tighten it.
- Clear Your Line Path: Ensure there are no twists or knots in your line between the rod tip and your lure.
- Practice Your Cast (Gently!): Before you chuck it out into the middle of the lake, do a few practice casts in an open area. Get a feel for the weight, the balance, and how the line comes off the reel. You’re not trying to break any distance records here; you’re aiming for accuracy and control.
And that’s it! You’ve officially set up your fishing rod for lake fishing. It might have felt like a lot at first, but with a little practice, this will become second nature. Think of all the fish you’re now equipped to potentially catch!
Remember, every angler starts somewhere. My first tangle was legendary, and yours might be too. But the joy of finally feeling that tug on the line, of the reel singing as a fish makes a run, and the satisfaction of bringing your catch in (or even just enjoying the peace of the water) is absolutely worth a little initial confusion. So, go forth, set up that rod, and may your lines be tight and your adventures plentiful!