How To Wire Multiple Lights And Switches On One Circuit

Hey there, coffee buddy! So, you're eyeing that cluster of lights and thinking, "Can I really get all these to play nice with just one switch?" The answer, my friend, is a resounding yes! It's not as scary as it sounds, I promise. Think of it as a little electrical ballet, with all your lights dancing to the tune of a single switch. Fun, right?
We're going to dive into wiring multiple lights and switches on one circuit. Imagine this: you walk into a room, flip one switch, and BAM! The whole space is illuminated. No more hunting for individual switches for every single lamp. It's the epitome of lazy genius, if you ask me. Or maybe just plain smart. Depends on how much coffee I've had.
First things first, safety! I know, I know, it’s the boring part. But seriously, you don’t want to be the reason your house does a dramatic light show at 3 AM, do you? Always, and I mean always, turn off the power at the breaker box. Don’t be a hero. Find that breaker labeled "lights" or "circuits" or whatever cryptic name your electrician friend gave it. And then, double-check. Use a voltage tester. Those things are your best buds. No power? Good. Now we can get our hands a little dirty (metaphorically, of course).
The Grand Plan: How It All Connects
So, what’s the secret sauce? It’s all about how you connect things. Think of the electricity flowing from your breaker box like a river. This river needs to reach all your light fixtures and the switch that controls them. We’re not going to create a complex maze, oh no. We’re going to create a simple, elegant path.
The most common way to do this is called the "home run" method. It sounds impressive, doesn't it? Like you're sending a little electrical signal all the way home. In this setup, the power from the breaker box goes directly to your switch first. Then, from that switch, it branches out to all your lights. Each light gets its own little wire snaking from the switch. Pretty neat, huh?
Another way, which is also super common, is to have the power go to the first light fixture in your string. Then, from that first light, you daisy-chain the power to the next light, and then to the next, and so on. Finally, from the last light in the chain, you run a wire back to your switch. This is like a little electrical parade, with the power marching from one fixture to the next before reporting back to the boss (the switch).
Which one is better? Honestly, it depends on your setup and what makes the most sense for your particular wiring situation. The home run is often considered a bit cleaner and easier to troubleshoot down the line, but daisy-chaining can be perfectly fine and sometimes even easier to run the wires. We’ll get into the nitty-gritty of both!
The "Home Run" Method: Power to the Switch First!
Let’s start with the home run. This is where the power from your breaker box comes straight to your switch. Imagine the breaker box as the main water tower. This wire is the main pipe from the tower to your house's main faucet (the switch).
So, you’ll have a wire coming from the breaker box. This wire typically has three conductors: a hot wire (usually black), a neutral wire (usually white), and a ground wire (bare copper or green). These are your important players.
This incoming wire connects to your switch. How? Well, your switch will have terminals. You’ll connect the hot wire from the breaker box to one of the terminals. The neutral wire from the breaker box usually bypasses the switch entirely. It goes on its merry way to the lights. We'll talk more about that in a sec.

Now, from your switch, you'll have an outgoing wire. This wire will also have hot, neutral, and ground. The hot wire from the switch is what’s going to power your lights. The neutral and ground wires from the switch will also go to your lights, and they need to be connected properly.
Here’s the cool part: The hot wire from the breaker box goes into the switch. The hot wire that goes out to the lights is connected to the other terminal on the switch. So, when you flip the switch, you’re basically completing or breaking the circuit for the hot wire going to your lights. It’s like opening and closing a tiny gate for the electricity.
Now, for those neutral and ground wires. They're important too! They need to make it to your lights. The neutral wire from the breaker box will connect to the neutral wire going to your lights. The ground wire from the breaker box will connect to the ground wire going to your lights. You're essentially just passing them through the switch box. Think of them as the VIPs who don't need to stop for a chat with the switch, they just need to get to the party.
At each light fixture, you'll have wires coming in. You'll connect the hot wire (from the switch) to the hot terminal on the light. You’ll connect the neutral wire to the neutral terminal on the light. And you’ll connect the ground wire to the ground screw on the light fixture. Easy peasy, lemon squeezy!
The Daisy-Chain Method: Power to the First Light!
Alright, let's talk about the daisy-chain method. This one is like a relay race for electricity. The power starts at the breaker, goes to the first light, then passes through to the next, and the next, until it finally makes its way back to the switch.
So, the power from the breaker box (hot, neutral, ground) comes into the electrical box of your first light fixture. Here’s where it gets a little more interesting. You’ll connect the incoming hot wire from the breaker to a pigtail wire. This pigtail will then connect to the hot terminal on your first light fixture.
The neutral wire from the breaker box will also connect to a pigtail. This pigtail connects to the neutral terminal on your first light. You also need to connect the outgoing neutral wire that’s going to the next light in the chain to this same connection. It’s like all the neutrals are holding hands. They all need to be connected together.
Same with the ground wire. Connect the incoming ground to a pigtail, and then connect that pigtail to the ground screw on the light fixture. Plus, connect the outgoing ground wire for the next light in the chain to this same spot. Ground wires are like the safety net; they all need to be connected.
Now, from that first light fixture, you’ll run a new wire to the second light fixture. This wire will carry the power to the second light. So, in the second light’s electrical box, you’ll have wires coming in from the first light. You’ll connect the hot wire from the first light to the hot terminal on the second light. You’ll connect the neutral wire from the first light to the neutral terminal on the second light, and to the neutral wire going to the third light (if you have one). And the ground wires, you guessed it, all get connected together.
You repeat this process for each light fixture. Each light receives power from the previous one. It’s a chain reaction! The last light in the chain is the one that’s most important for connecting back to the switch.
From the last light fixture in the chain, you’ll run a wire back to your switch. This wire will carry the switched hot wire to the light. So, in the switch box, you’ll have the incoming power from the breaker box. You’ll connect the neutral and ground wires from the breaker box to the outgoing neutral and ground wires that go to your lights (or to a grounding/neutral bus bar if you have one). The hot wire from the breaker box connects to the incoming terminal on your switch. And the wire coming from the last light fixture connects to the outgoing terminal on your switch. When you flip the switch, you're completing the circuit for the hot wire that travels all the way back from the last light.
Wiring a Switch: The Brains of the Operation
Okay, let's talk about the switch itself. It’s like the traffic cop for your lights. It tells them when to turn on and when to turn off. Most standard light switches are "single-pole" switches. They have two screw terminals (plus a ground screw, usually green). You’ll typically connect the incoming hot wire to one terminal and the outgoing hot wire to the other.
Remember in the "home run" method, we said the neutral and ground bypass the switch? That’s because a single-pole switch is designed to interrupt the hot wire. It doesn't need to mess with the neutral or ground. They just need to flow continuously to complete the circuit.
In the "daisy-chain" method, the switch is usually placed at the end of the wiring run, meaning it receives power from the last light fixture. So, the hot wire from the last light connects to the incoming terminal of the switch. The hot wire that goes back to power all the lights (which came from the breaker box initially, but was passed through all the lights) connects to the outgoing terminal of the switch. It sounds a bit backward, I know, but it works! When you flip the switch, you’re either allowing power to flow from the last light back to the other lights, or you’re cutting it off.
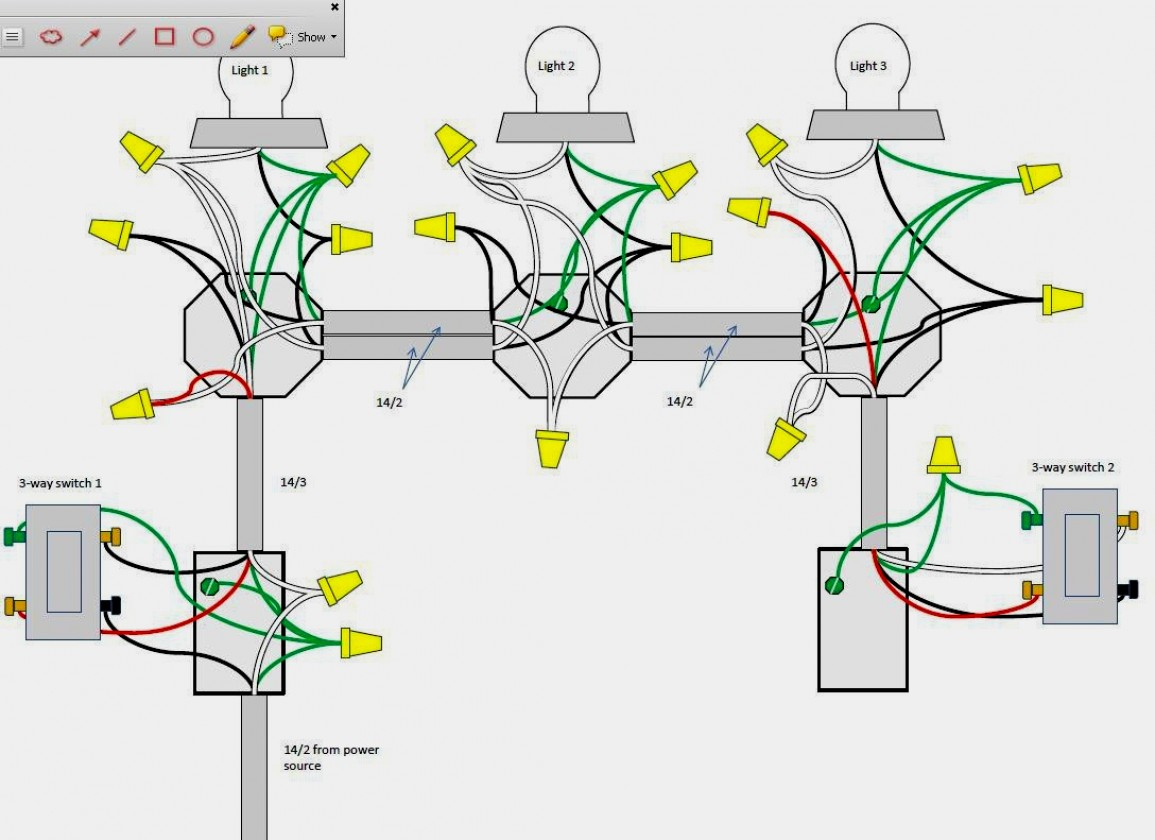
Now, what if you want multiple switches to control the same lights? Ah, this is where things get a little more exciting. This is called a "three-way switch" or a "four-way switch" setup. Don’t let the names scare you!
Three-Way Switches: Control from Two Locations
Imagine you have an entrance light that you want to control from both the front door and the hallway. That’s a job for two three-way switches. A three-way switch has three screw terminals (plus a ground screw). Two of these terminals are called "traveler terminals," and one is called the "common terminal."
The magic here is that power can travel between the two traveler terminals on each switch. The common terminal is where the power either enters the switch or exits to the light. How the power flows between the travelers depends on the position of the switch.
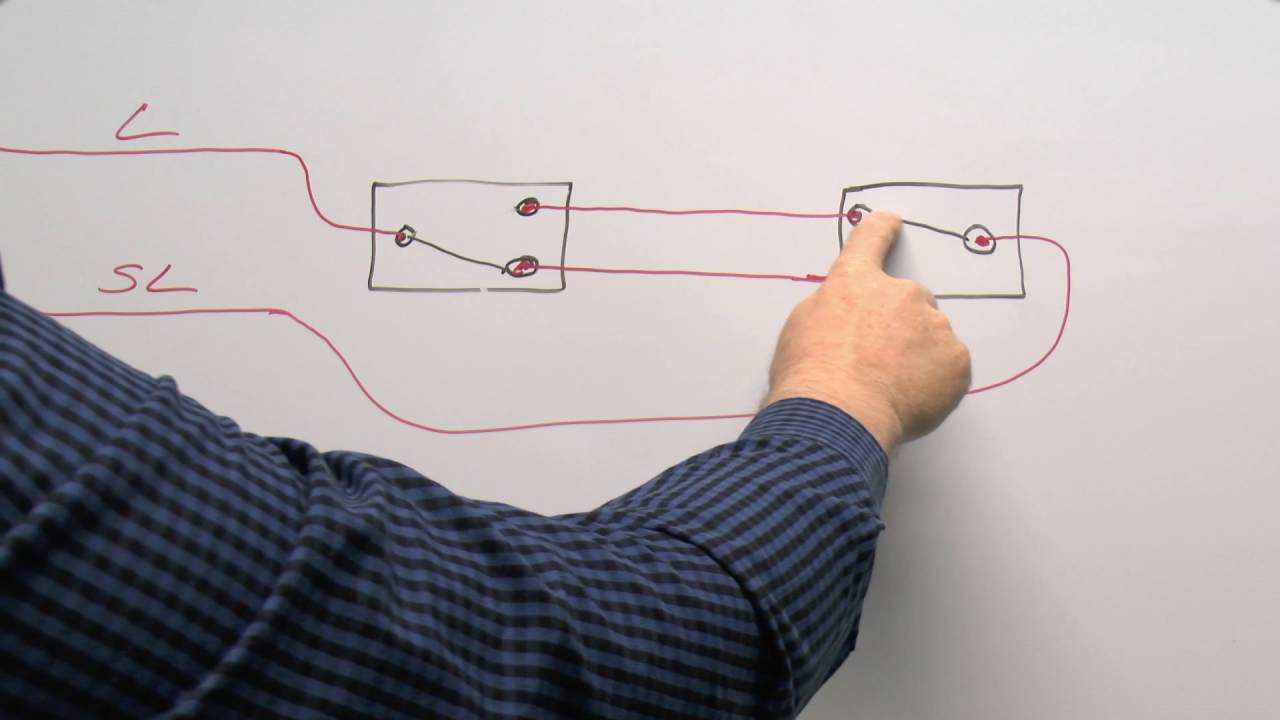
In a basic three-way setup, the power from the breaker box goes to the common terminal of the first three-way switch. Then, wires (travelers) connect the traveler terminals of the first switch to the traveler terminals of the second three-way switch. Finally, a wire connects the common terminal of the second three-way switch to your light fixture.
So, if switch A is in one position, it connects the incoming hot to one traveler. If switch B is also in a position that connects that same traveler to its common terminal, the light turns on. If you flip either switch, you break the path, and the light goes off. It’s like a little electrical puzzle. You’re creating two possible paths for the electricity to flow, and flipping either switch changes which path is active.
The neutral wire from the breaker box simply goes directly to the light fixture. The ground wires are all connected together throughout the system.
Four-Way Switches: Control from Three or More Locations
Now, what if you want to control your lights from three or even four different spots? Like in a long hallway or a large room with multiple entrances. That’s where a four-way switch comes in. You’ll use two three-way switches (one at the beginning and one at the end of your control points) and then one or more four-way switches in between.
A four-way switch has four screw terminals. Two on one side and two on the other. Think of these as two pairs of travelers. The idea is that the four-way switch simply reverses the connections between the traveler wires coming from the previous switch and going to the next switch. It's like a traffic director, ensuring the correct flow between the traveler pairs.
So, the power comes into the common terminal of the first three-way switch. The travelers go from the first three-way switch to the first four-way switch. The four-way switch then sends travelers to the second four-way switch (if you have one), and so on. Finally, the travelers from the last four-way switch go to the traveler terminals of the second three-way switch. The common terminal of that second three-way switch then goes to your light fixture. The neutral and ground wires continue to flow directly to the light.

It sounds complicated, but the principle is the same: you're creating multiple paths, and each switch, whether it's a three-way or a four-way, simply changes the active path. It’s like having a bunch of friends holding hands, and each person can change which hand they're holding, but as long as someone is holding the right hands, the connection is made!
Important Considerations and Safety First (Again!)
Before you even think about touching a wire, let's recap some crucial points. Always, always turn off the power at the breaker. Seriously, I can't stress this enough. It’s better to be safe than to have a shocking experience. And use a voltage tester to confirm there's no power. It's your best friend in this whole operation.
Make sure your wires are the correct gauge for the circuit. Overloaded wires are a fire hazard, and nobody wants that. If you’re unsure, it’s always best to consult an electrician. They know this stuff inside and out, and a little professional help can save you a lot of headaches (and potential sparks).
When making connections, use proper wire nuts. They ensure a secure and insulated connection. Twist the wires together firmly before screwing on the wire nut. And make sure the wire nut is the right size for the number and gauge of wires you're connecting.
Grounding is super important. It’s your safety net. Make sure all your ground wires are connected together and to the ground screw on all your metal light fixtures and switch boxes. This is crucial for preventing electrical shock.
Don't overload your circuit. Know the amperage of your circuit breaker and don’t exceed the wattage rating of your light fixtures. If you’re putting in a lot of lights, you might need to consider a dedicated circuit. It’s like not putting too many people on a small raft; it’s just asking for trouble.
And finally, if you’re ever feeling unsure or overwhelmed, call a professional electrician. There’s no shame in it! They can ensure everything is wired correctly and safely, and that’s worth its weight in gold. Think of it as an investment in your peace of mind. You get your lights working, and you don’t have to worry about any electrical oopsies.
So, there you have it! Wiring multiple lights and switches on one circuit isn't rocket science. With a little patience, the right tools, and a healthy respect for electricity, you can absolutely conquer this project. Go forth, my friend, and illuminate your world!