Installing Gutters On Metal Building

Hey there, my metal building pals! So, you've got yourself one of those super sturdy, super cool metal buildings, right? Awesome! But let's be honest, all that sleek metal can look a little… unfinished without a proper gutter system. And when you're dealing with a metal building, the thought of installing gutters might sound about as appealing as wrestling a greased pig. But fear not, my friends! It's actually way more doable than you think, and totally worth it. Think of it as giving your metal masterpiece a stylish little accessory that also happens to be incredibly practical. No more rogue waterfalls cascading down your precious walls, right?
Today, we're going to break down how to get those gutters on your metal building, making it a breeze, not a blizzard of confusion. We’ll keep it simple, fun, and, dare I say it, actually enjoyable. Ready to dive in? Let's get our DIY hats on!
Why Gutters Are Your Metal Building's New Best Friend
Before we get our hands dirty, let's have a quick chat about why we're even doing this. It’s not just about aesthetics, though a well-placed gutter can definitely spiff up your building. The real heroes here are water management and damage prevention. Think about it: rain (or snow melt, if you’re in a chillier climate) hits your roof and, without gutters, it’s going to do its own thing. That “thing” usually involves running down the sides of your building. Over time, this can lead to some nasty stuff:
- Foundation erosion: Nobody wants their foundation to start taking a vacation.
- Wall staining and mold: Ugh, the dreaded dark streaks and fuzzy green stuff.
- Rusting metal panels: This is a biggie for metal buildings. Constant moisture can accelerate rust, and nobody wants their cool metal to look like it’s been through a rusty fight club.
- Landscaping damage: If you’ve got a garden or flower beds nearby, relentless water runoff can turn them into mud puddles faster than you can say "drowning petunias."
So, yeah, gutters are kind of like tiny superheroes for your building, channeling all that potentially destructive water away to where it belongs – usually a downspout and then, hopefully, far, far away from your structure. It’s like giving your building a polite, controlled sip instead of a wild, unmannered gulp.
Gathering Your Gutter Goodies: What You'll Need
Alright, let’s talk tools and materials. This isn’t a high-stakes, surgical procedure, so don't be intimidated. Most of this stuff you can probably find at your local hardware store. Think of it as a treasure hunt for practical solutions!
The Gutters Themselves
For metal buildings, you’ve got a few options. Seamless gutters are usually the way to go. They’re fabricated on-site, so they have fewer seams, which means fewer places for leaks to sneak in. Score! You can get them in various materials, but for a metal building, aluminum or galvanized steel are your buddies. They’re durable, lightweight, and won't laugh at the weather.
You’ll also need to decide on the size. For most residential or smaller commercial metal buildings, 5-inch gutters are a good standard. If you've got a massive roof or live in an area with torrential downpours, you might want to go a bit bigger, like 6-inch. When in doubt, a little extra capacity never hurt anyone. Think of it as having a bigger straw for your drink – more efficient!
The Fancy Fixings: Brackets and Hangers
These are the guys that hold your gutters in place. For metal buildings, the most common and often the easiest method is using gutter hangers that attach directly to the fascia or, in some cases, the roof. You’ll want heavy-duty ones, especially if you live in a place with snow. They come in different styles, so ask your friendly hardware store employee for recommendations for metal buildings. They’re the unsung heroes, working tirelessly behind the scenes.
Downspouts and Elbows: The Water's Escape Route
This is where the water actually goes. You’ll need downspouts and elbows to guide the water from the gutter to the ground. Make sure they’re the same material and color as your gutters for that cohesive, "I totally meant for this to look this good" vibe. The number of downspouts you need depends on the length of your gutter runs. Generally, one downspout for every 30-40 feet of gutter is a good rule of thumb.
Seams and Sealants: Keeping the Good Stuff In (and the Bad Stuff Out!)
If you’re not going for a completely seamless installation (which is totally fine!), you’ll need gutter sealant and possibly seam clips. The sealant is like a super-strong, flexible glue that waterproofs those connections. Don't skimp on this stuff; it's your insurance against drips and leaks. Think of it as the chapstick for your gutters – keeps them smooth and leak-free!
Fasteners: Screws, Rivets, Oh My!
You'll need screws or rivets to attach everything. For metal buildings, it's usually best to use self-tapping screws or rivets that are designed for metal. They’ll bite into the metal without you needing to pre-drill a million holes. Make sure they’re exterior-grade so they don’t rust faster than a forgotten bobby pin in the rain.
Measuring and Marking Tools: Be Precise, Grasshopper
You'll need a trusty tape measure, a level (a long one is great for this job), and a pencil or marker. Accuracy here saves you headaches later. We’re not aiming for a Picasso, but we do want straight, functional gutters!
Safety First, Friends!
And, of course, don't forget safety gear: work gloves, safety glasses, and a sturdy ladder. If your building is tall, consider a harness or getting a friend to help. Safety is unglamorous but incredibly important. Don't be a hero; be a smart DIYer!
The Grand Installation Plan: Step-by-Step (Don't Sweat It!)
Okay, deep breaths. We’re going to tackle this bit by bit. Imagine you're assembling a really cool, giant LEGO set for your building. That’s kind of what this is like!
Step 1: Plan Your Gutter's Path (The "Where Does This Go?" Phase)
Before you even grab a tool, sketch out your plan. Figure out where your downspouts will go. Ideally, they’ll lead water away from your building's foundation. Consider the slope of your roof and the existing drainage on your property.
Pro Tip: Gutters need a slight slope towards the downspout to allow water to flow. We’re talking a drop of about 1/4 inch for every 10 feet of gutter. Too much slope and your water will be doing a downhill sprint; too little and it’ll hang around like an awkward guest. A good level is your best friend here.
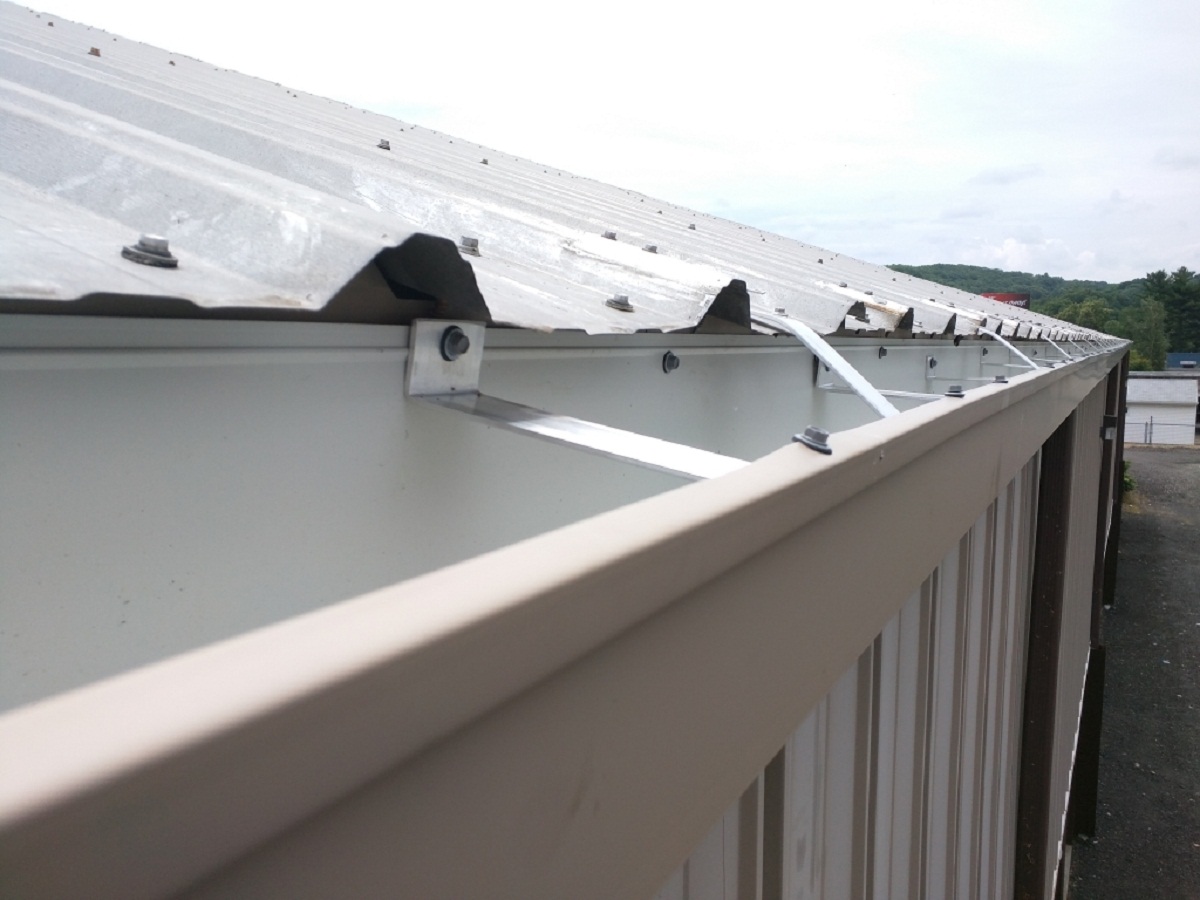
Step 2: Attaching the Hangers (The "Squeezing the Support" Part)
This is where the rubber meets the road, or rather, the metal meets the hanger. For metal buildings, you often attach hangers directly to the roof panels or, if you have them, to the fascia. Many metal building systems have pre-drilled holes or specific attachment points that make this easier.
Measure and mark where your hangers will go. You’ll typically place them every 2-3 feet. Use your level to ensure your marks are consistent with the desired slope. Then, secure the hangers with your chosen fasteners. If you're drilling into metal panels, make sure you use the correct drill bit and a sealant around the screw heads to prevent leaks.
Playful Aside: Think of these hangers as tiny, metal embrace-holders for your gutters. They’re giving them a big, secure hug!
Step 3: Measuring and Cutting Your Gutters (The "Precision Cuts" Moment)
Now for the main event – the gutters themselves! Measure the length of each section you need. You might have to join multiple pieces together, especially on longer runs. Mark your cutting lines clearly.
Use a fine-tooth saw or a specialized metal cutting tool to cut your gutters. Be sure to wear your safety glasses for this part – flying metal bits are no fun! Once cut, you might want to lightly sand the cut edge to make it smooth.

Step 4: Assembling the Gutter Sections (The "Puzzle Time" Edition)
If you’re joining sections, use your seam clips and gutter sealant. Apply a generous bead of sealant along the edge of one gutter section, then slide the next section into it. Secure with seam clips. This is your chance to create a watertight bond. Don't be stingy with the sealant; think of it as giving your gutters a comforting, waterproof hug!
Humorous Thought: If you accidentally get sealant on your hands, it’s just your body’s way of saying it wants to be a bit more… sticky for a while. Good luck washing it off!
Step 5: Mounting the Gutters (The "Putting It All Together" Grand Finale)
With your hangers in place, it’s time to hang those beauts! Carefully lift your assembled gutter sections and hook them onto the hangers. Make sure they’re sitting securely and following your marked slope. Secure the gutters to the hangers using screws or rivets, as per the hanger manufacturer’s instructions.
Repeat this for all sections of your gutter system. Take your time and ensure everything is level and snug. This is the most visually rewarding part, seeing those sleek lines take shape!
Step 6: Installing End Caps and Corners (The "Sealing the Deal" Closer)
Now, let’s close off the ends. Apply sealant to the inside of your end caps and press them firmly onto the ends of your gutters. Secure with screws or rivets. Do the same for any corner pieces (miters). This is crucial for preventing leaks at the transitions.
Step 7: Attaching Downspouts and Elbows (The "Water's Journey" Adventure)
This is where the water gets its adventure! Attach your downspout elbows to the outlets on your gutters. Then, connect the downspout sections, using elbows to navigate around any obstructions. Secure the downspouts to the wall of your metal building with downspout brackets. Make sure they’re also sloped slightly downwards to encourage water flow.

Wise Words (with a wink): Always ensure your downspouts are directing water away from your building. You don't want to create a miniature moat around your foundation. That's a bit too much of a good thing!
Step 8: The Final Inspection (The "Victory Lap" Check)
Once everything is installed, grab a hose and give your new gutters a test run! Stand back and watch the water flow. Check for any drips or leaks at the seams, end caps, or downspout connections. If you see any, a little more sealant should do the trick. Admire your handiwork – you did it!
A Little Extra Love: Maintenance Tips
Your new gutters will be pretty low-maintenance, but a little TLC goes a long way. Periodically (at least twice a year, or more if you have lots of trees nearby), clean out any leaves, twigs, or debris that might accumulate. A simple garden hose can help flush them out. Also, give them a quick visual inspection to make sure everything is still secure.
Funny Thought: Think of cleaning your gutters as giving them a spa day. They work hard for you, so a little pampering is definitely in order!
You've Conquered the Gutter Gauntlet!
See? That wasn’t so bad, was it? You’ve just armed your awesome metal building with a crucial defense system, and you did it yourself! You’re basically a gutter guru now. High fives all around!
Now, your metal building is not only looking sharp and protected from the elements, but it's also ready to handle whatever Mother Nature throws at it, one drip at a time. Go ahead, pat yourself on the back. You’ve earned it. And the next time it rains, you can sit back, relax, and admire your handiwork, knowing that your building is comfortably channeling water away, all thanks to your brilliant DIY skills. You’ve made your metal friend even happier and more resilient. Pretty darn cool, if you ask me!