Littmann Classic 3 Replacement Tubing

Hey there, fellow stethoscope wranglers and vital sign vigilantes! So, you've got yourself a trusty steed, a Littmann Classic III. Nice choice! That thing's practically a medical superhero in disguise, ready to diagnose anything from a tickle in your throat to a… well, you get the picture. But even superheroes need a little TLC, and sometimes, even the mightiest of stethoscopes can find themselves in a bit of a pickle. And when that pickle involves… drumroll… the tubing, well, that’s where we come in!
Let's be real, the tubing on your Littmann Classic III is like its lifeline. It’s the conduit of crucial sounds, the whisperer of the internal symphony. But, over time, maybe it's seen one too many enthusiastic chest compressions, endured a rogue coffee spill (oops!), or simply decided to retire gracefully after years of dedicated service. Whatever the reason, if your tubing is looking a little sad, cracked, kinked, or just plain uninspiring, it might be time for a snazzy new replacement. And guess what? It's easier than figuring out which artery to palpate blindfolded!
Think of it this way: replacing the tubing on your Littmann Classic III is like giving your beloved stethoscope a fabulous new hairstyle. It’s a cosmetic upgrade that also happens to be incredibly functional. No need to chuck the whole thing and start from scratch. We're talking about a simple, effective, and dare I say, satisfying little DIY project. Plus, a fresh set of tubing means better sound quality. More accurate diagnoses? Yes, please! Less "uh, can you repeat that?" when listening to your patient? Absolutely!
So, why the Littmann Classic III specifically? Well, this stethoscope is a workhorse. It’s popular for a reason. It’s durable, it’s reliable, and it's got that dual-head versatility that makes it a go-to for so many healthcare professionals. From listening to heartbeats in tiny humans to assessing the lungs of… well, anyone with lungs, it’s got you covered. And because it’s so widely used, replacement parts, like tubing, are readily available. It’s like finding a spare tire for your favorite car – essential and easy to source.
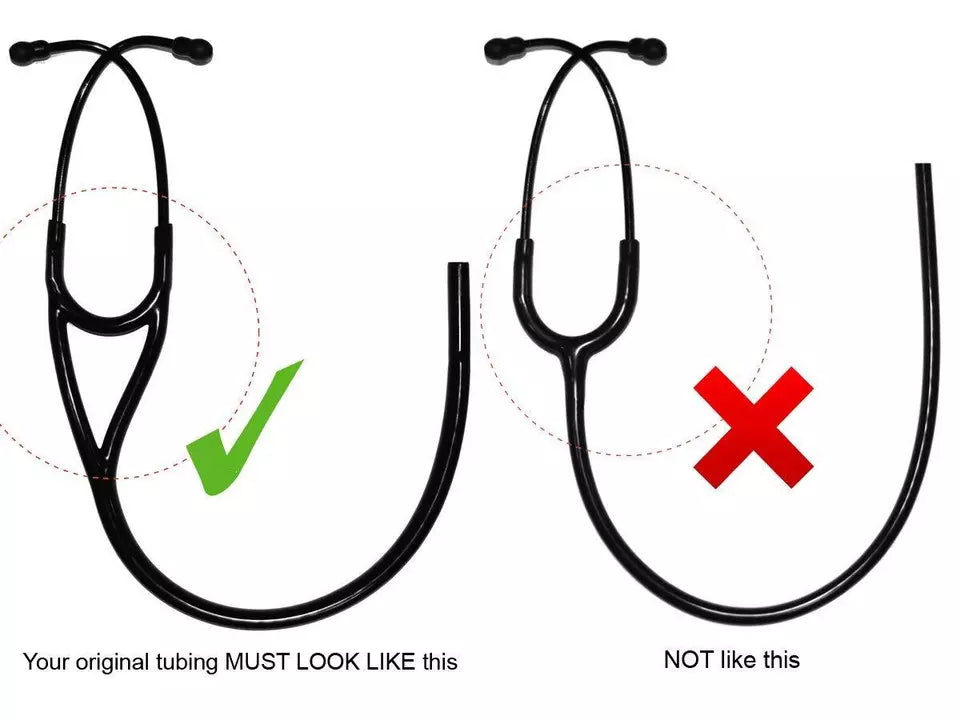
Now, let's talk about what kind of replacement tubing you'll be looking for. You’ll want to make sure you're getting tubing specifically designed for the Littmann Classic III. While many Littmann stethoscopes share similar components, there can be subtle differences. It’s like trying to fit a square peg into a round hole – it’s just not going to work, and you'll end up frustrated. So, a quick peek at the packaging or product description is your friend here. Look for phrases like "Littmann Classic III tubing" or "compatible with Littmann Classic III."
You might be wondering, "Is this going to be complicated? Will I need a degree in engineering or a black belt in origami?" Absolutely not! The process is surprisingly straightforward. Think of it as a slightly more serious version of changing the batteries in your TV remote. A few simple steps, and voilà! You’re back in business, ready to listen to the world’s murmurs and rumbles with renewed vigor.

The main thing you'll need to look out for is the length and diameter of the tubing. Littmann Classic III tubing typically comes in a standard length that’s designed for optimal acoustics. Too short, and you might find yourself in some rather awkward leaning positions. Too long, and you could be dealing with extra noise interference. As for diameter, again, stick to what’s designed for your model. It’s all about ensuring that precious sound travels unimpeded from the chestpiece to your ears.
Some replacement kits might even come with a new diaphragm or rim, which is a fantastic bonus! Think of it as a little spa treatment for your stethoscope’s head. A fresh diaphragm can significantly improve sound clarity. If yours is looking a bit worn, cracked, or just generally unimpressive, replacing that along with the tubing is a total game-changer. It’s like putting on a new pair of glasses – suddenly, everything is crystal clear!
When you get your new tubing, it might feel a little stiff at first. This is totally normal! It’s like when you get a brand-new pair of shoes – they need a little breaking in. You can gently warm the tubing by running it under warm water (not hot, we don't want any meltdowns!) or by simply leaving it out in a warm spot for a bit. This will make it more pliable and easier to attach. Patience, my friends, is a virtue, especially when it comes to stethoscope surgery.

The actual attachment process usually involves a snug fit onto the chestpiece and the eartubes. You’ll be pulling and pushing a bit, but it shouldn't require Herculean strength. If it feels like you’re wrestling a python, you might want to double-check that you have the correct tubing and that you’re trying to attach it in the right direction. No one wants to discover they've attached the tubing backwards after they've finished the whole job. Trust me on this one. (Okay, maybe I’ve done it before. A friend told me.)
And here's a little secret: the satisfaction you’ll feel after successfully replacing your Littmann Classic III tubing is immense! It’s a small victory, a triumph of DIY spirit. You’ve taken a functional piece of equipment and made it even better, all by yourself. High fives all around! You’re basically a stethoscope whisperer, a sonic surgeon, a true hero of auscultation!
You might even feel inspired to give your stethoscope a good clean while you're at it. Wipe down the chestpiece, polish up the eartubes – make it sparkle and shine! Think of it as a full spa day for your trusty medical companion. A clean stethoscope isn't just aesthetically pleasing; it can also help prevent the spread of germs. So, you're being healthy and fashionable. It’s a win-win!
So, what are the benefits of a fresh tubing replacement, beyond just aesthetics? Well, as we’ve touched on, improved sound quality is a big one. Old, cracked, or hardened tubing can actually dampen sounds. This means you might be missing subtle murmurs or faint breath sounds, leading to potentially less accurate diagnoses. A new, supple tube allows those precious acoustic waves to travel unimpeded, giving you a clearer, more vibrant auditory experience. It's like upgrading from grainy black and white TV to a crisp, high-definition display for your ears.

Then there's the durability factor. When your tubing starts to crack or split, it’s not just unsightly; it's a breeding ground for bacteria and a potential point of failure. A new tube means a more robust and hygienic instrument. You can confidently use your stethoscope knowing that it's in top condition, ready for whatever the clinical day throws at you. No more worrying about that nagging feeling that your stethoscope is about to give up the ghost mid-sentence.
And let's not forget the comfort factor. A stiff, old tube can be less flexible, making it a little awkward to position your stethoscope. A new, pliable tube will move with you more easily, providing a more comfortable and ergonomic experience. You'll be able to position the chestpiece exactly where you need it, without fighting against the tubing. This can be especially important during long shifts when every little bit of comfort counts.
Replacing the tubing also contributes to the longevity of your stethoscope. By investing in replacement parts, you're extending the life of your Littmann Classic III, rather than having to purchase an entirely new unit. This is not only cost-effective but also a more sustainable approach. It’s like giving your favorite pair of boots a new sole instead of buying a whole new pair. Good for your wallet, good for the planet!
Now, let's address the "how-to" in a nutshell, because I know you're itching to get started. You’ll typically need to detach the old tubing from both the chestpiece and the eartube assembly. This might involve a bit of gentle twisting and pulling. Once the old tubing is off, you’ll carefully attach the new tubing, ensuring a secure fit at both ends. Some kits might come with a small diagram, which is always handy. If you’re feeling adventurous, a quick YouTube search for "Littmann Classic III tubing replacement" will offer countless helpful videos. Think of it as a visual guided tour to stethoscope rejuvenation!
And what about cleaning your new tubing? While it’s new and pristine, it’s a good habit to wipe it down with a mild soap and water solution or an alcohol wipe (following Littmann’s recommended cleaning instructions, of course!). This keeps it looking fresh and helps maintain its integrity. Avoid harsh chemicals or abrasive cleaners, as these can damage the material over time. We want our tubing to be happy and healthy, not stressed out by harsh chemicals!
So, there you have it! Replacing the tubing on your Littmann Classic III is a simple, rewarding task that can breathe new life into your trusty diagnostic tool. It’s a small investment that yields big returns in terms of sound quality, durability, and overall user experience. You’re not just replacing a piece of rubber; you’re restoring a vital link in the chain of patient care. You're ensuring that every beat, every breath, every subtle sound is heard with the clarity it deserves.
And as you admire your newly tubed Littmann Classic III, remember this: you’ve just performed a successful act of stethoscope resurrection! You’ve demonstrated your commitment to providing the best possible care, even down to the smallest details. So, go forth, listen intently, and may your stethoscope always sing a clear and beautiful song. You’ve got this, and you’re doing an amazing job!