
Parts Of A Metal Railing

You know, I had this friend, Sarah, who was super into DIY. Like, she’d tackle anything. She once decided to build a whole deck by herself. Impressive, right? Except she completely underestimated the sheer weight of treated lumber. Let’s just say there were some interesting calls for help involving a wheelbarrow and a very worried-looking dog. Anyway, one of her next projects was a fancy new metal railing for her porch. She’d seen it in a magazine and was instantly smitten. She spent weeks poring over catalogues, oohing and aahing at the different designs. But then came the actual building part, and she hit a snag. She’d bought all these gorgeous pieces, but she wasn’t entirely sure what they were called or how they were supposed to fit together. It looked like a very expensive, very shiny pile of metal spaghetti.
That’s when it hit me. We often see these beautiful, finished railings, looking all sleek and safe, and we just… admire them. We don’t really think about the individual bits and bobs that make them work. It’s a bit like looking at a perfectly plated meal; you don’t necessarily consider all the chopping, sautéing, and seasoning that went into it. So, I thought, why not dive into the nitty-gritty of metal railings? Let’s pull back the curtain, so to speak, and explore the anatomy of these often-overlooked structures. Because trust me, there’s more to a railing than meets the eye!
Think about it. A railing isn't just a random collection of metal bars. It's a carefully engineered system designed for safety, stability, and, let's be honest, a bit of curb appeal. And like any good system, it’s made up of distinct components, each with its own job to do. It’s kind of like a band; you need the drummer, the guitarist, the bassist, and the lead singer, all playing their part to create a harmonious sound. Without one, the whole thing falls apart. So, buckle up, folks, because we’re about to get acquainted with the stars of the railing show!
The Foundation: What Holds It All Up
Every good structure needs a solid base, and that’s exactly where we’ll start. When you’re talking about a metal railing, especially one that’s attached to a surface like a deck, stairs, or a balcony, you’re going to be dealing with some serious anchoring. These are the unsung heroes, the ones working behind the scenes to keep everything from doing a dramatic tumble.
Posts: The Backbone of the Operation
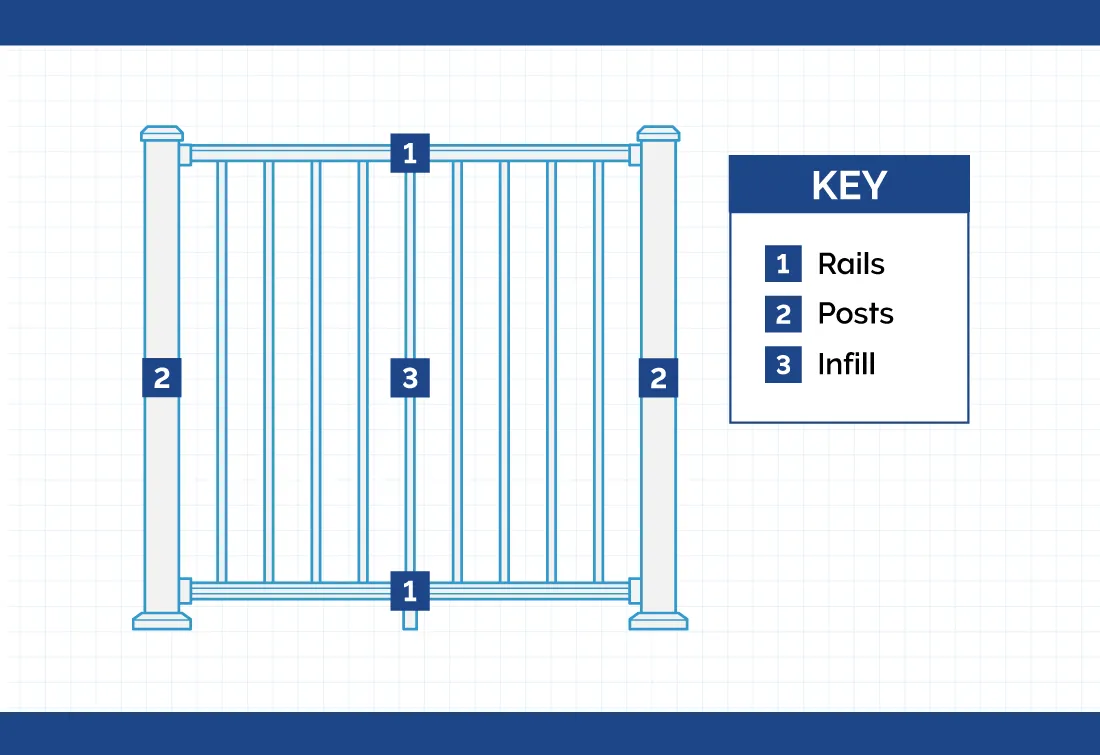
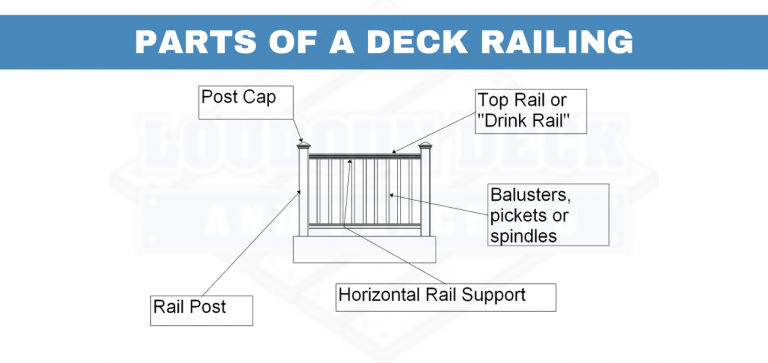
First up, we’ve got the posts. These are the vertical giants, the main supports that go from the ground (or deck, or whatever surface you’re attaching to) all the way up to the top of your railing. They’re essentially the skeleton of the whole thing. Without them, you’d just have a floppy, sad excuse for a railing.
You’ll find posts come in all sorts of shapes and sizes. Some are round, some are square, some have fancy decorative tops. The choice often depends on the overall style you’re going for. Think of them as the leading actors in our railing play – they have to be strong, dependable, and look good doing their job.
Now, how these posts are attached is crucial. You might have surface-mounted posts, which are bolted directly onto the top of a deck or concrete slab. These are pretty common and, when done right, are very secure. Then there are base-mounted posts, which are often embedded into the ground or a concrete footing. These are your heavy-duty players, usually found on stairs or where extra stability is needed. And for those who like things really integrated, you might see through-deck posts, where the post goes all the way through the deck boards and is anchored underneath. Talk about commitment!
And a little tip from me to you: when you’re looking at posts, pay attention to the material and its thickness. A flimsy post is going to lead to a flimsy railing, and nobody wants that. Especially if little Timmy is leaning on it a bit too enthusiastically. Shudder. You want something that feels solid, you know?
Balusters/Spindles: The Filling in the Sandwich
Okay, so we’ve got our sturdy posts. Now, what goes between them? That’s where the balusters, or as some folks call them, spindles, come in. These are the vertical elements that fill the gaps between the posts. Their main job is to prevent people (and small, adventurous pets) from accidentally falling through. Safety first, always!
Just like posts, balusters come in a wild variety of styles. You can have simple, straight bars – clean and modern. You can have more decorative, twisted ones that add a touch of old-world charm. Or perhaps some really ornate, cast iron beauties that scream ‘Victorian elegance’. The possibilities are, dare I say, endless?
The spacing of your balusters is also super important, and often dictated by building codes. You don’t want them spaced so far apart that a toddler could wiggle through. That’s a big no-no. So, while you might love the look of widely spaced spindles, always check your local regulations. Safety trumps aesthetics, no matter how pretty those wide gaps might look.
And here’s something that might surprise you: the way balusters are attached can vary. They might be screwed directly into the posts, or they might fit into pre-drilled holes. Sometimes they’re held in place by a top and bottom rail, creating a more cohesive panel. It’s all about how you want it to look and how secure you need it to be.
The Connectors: Holding it All Together
Now that we’ve got our main supports and the infill, we need something to tie it all together and give us a comfortable place to… well, lean. These are the pieces that make a railing feel like a railing, rather than just a collection of posts and bars.
Top Rail: The Hand-Holder
This is probably the most obvious part of a railing, after the posts. The top rail is the horizontal piece that runs along the very top of the railing. It’s what you grab onto for support when you’re walking up or down stairs, or when you’re enjoying a beverage on your balcony and feeling particularly pensive.

The top rail is typically wider and flatter than the other horizontal components (if any). This makes it comfortable to hold. Think of it as the welcome mat for your hands. It needs to feel good!
Material-wise, the top rail can be the same metal as the rest of the railing, or it can be something different. You’ll sometimes see wooden top rails on metal railings for a warmer feel, or even composite materials. This is where you can really add a personal touch and create a contrast that makes your railing pop.
And listen, the structural integrity of the top rail is paramount. It needs to be strong enough to withstand the forces of people leaning on it, or worse, using it as a temporary seat. Ahem, Sarah, I’m looking at you. Wink.
Bottom Rail: The Grounding Element
While the top rail gets all the glory, the bottom rail is just as important. This is the horizontal piece that runs along the very bottom of the railing, usually sitting just above the deck surface or the ground. Its primary function is to tie the balusters to the posts at their base and provide an additional layer of stability.
It’s often a bit narrower than the top rail, and its design can vary greatly. Sometimes it’s very subtle, almost an afterthought. Other times, it’s a more substantial piece that complements the top rail and the overall design. It’s like the reliable bass player in the band; you might not always notice them, but the music just wouldn’t sound right without them.
The bottom rail also plays a role in preventing small objects from rolling underneath the railing and into the abyss. So, while it might not be as glamorous as the top rail, it’s definitely a hard worker.

Handrail: For the Extra Grip (and Safety)
Now, this is where things can get a little bit nuanced, and where some overlap with the top rail might occur. Sometimes, the top rail is the handrail. But in other cases, a separate handrail is added. This is especially common on stair railings, where that extra grip is a lifesaver.
A handrail is typically designed to be ergonomic – easy and comfortable to grip. It might be round, oval, or even have a specific profile that fits naturally in your hand. Think of it as a high-five for your palm.
The key differentiator for a handrail is its purpose. While a top rail is part of the overall barrier, a handrail is specifically for personal support. It’s that extra bit of security that can make a world of difference, especially for those with mobility challenges, or for anyone navigating a slippery set of stairs in the rain. So, even if your top rail looks super swanky, sometimes adding a dedicated handrail is a smart move for practicality.
The Details: The Bits That Make It All Work
Beyond the big structural components, there are all sorts of smaller pieces that hold everything together. These are the nuts and bolts, the elbows and connectors, if you will. They might seem insignificant, but without them, your railing would be… well, a pile of expensive metal spaghetti, just like Sarah’s.
Connectors and Brackets: The Hidden Helpers
These are the often-invisible heroes that physically join the different parts of the railing together. We’re talking about brackets, clamps, screws, and bolts. They’re the glue that holds the entire structure in place.
For instance, you’ll have brackets that attach the posts to the deck or concrete. You’ll have fittings that connect the top and bottom rails to the posts. And you’ll have various fasteners that secure the balusters. These are the unsung workhorses of the railing world. They don’t get much airtime, but they’re absolutely critical.
The type of connectors used will depend on the railing system and the materials. Some systems are designed for easy assembly with specific, proprietary connectors, while others rely on more standard hardware. It's always a good idea to use the connectors recommended by the manufacturer to ensure the best fit and the highest level of safety.
Caps and Finials: The Finishing Touches
Ah, the aesthetic elements! These are the bits that give your railing that polished, complete look. Caps are often placed on top of posts to protect them from the elements and give them a finished appearance. Think of them as little hats for your posts.
Finials, on the other hand, are decorative elements that can be added to the very top of posts or even at intervals along the railing. They can be anything from simple balls to ornate scrolls or fleur-de-lis. They’re like the jewelry of the railing world – purely for decoration, but they can make a huge difference in the overall style.
These little touches might seem minor, but they’re what elevate a functional railing to a beautiful architectural feature. They’re the exclamation point at the end of a sentence. Or, in Sarah’s case, they would have been the cherry on top of her metal spaghetti mountain.
Putting It All Together (Figuratively Speaking!)
So there you have it! A not-so-brief tour of the various parts that make up a metal railing. From the mighty posts to the decorative finials, each piece plays a vital role in creating a structure that is both safe and stylish.
Next time you see a beautiful metal railing, take a moment to appreciate the engineering and craftsmanship that went into it. It’s not just metal; it’s a carefully assembled system designed to keep you safe and add a touch of elegance to your surroundings. And maybe, just maybe, you’ll find yourself mentally ticking off all the components. “Oh, look! There’s a sturdy post, a nicely spaced set of balusters, a comfortable top rail… and a rather charming finial!” You’ll be practically an expert. Just try not to end up with a pile of metal spaghetti yourself!