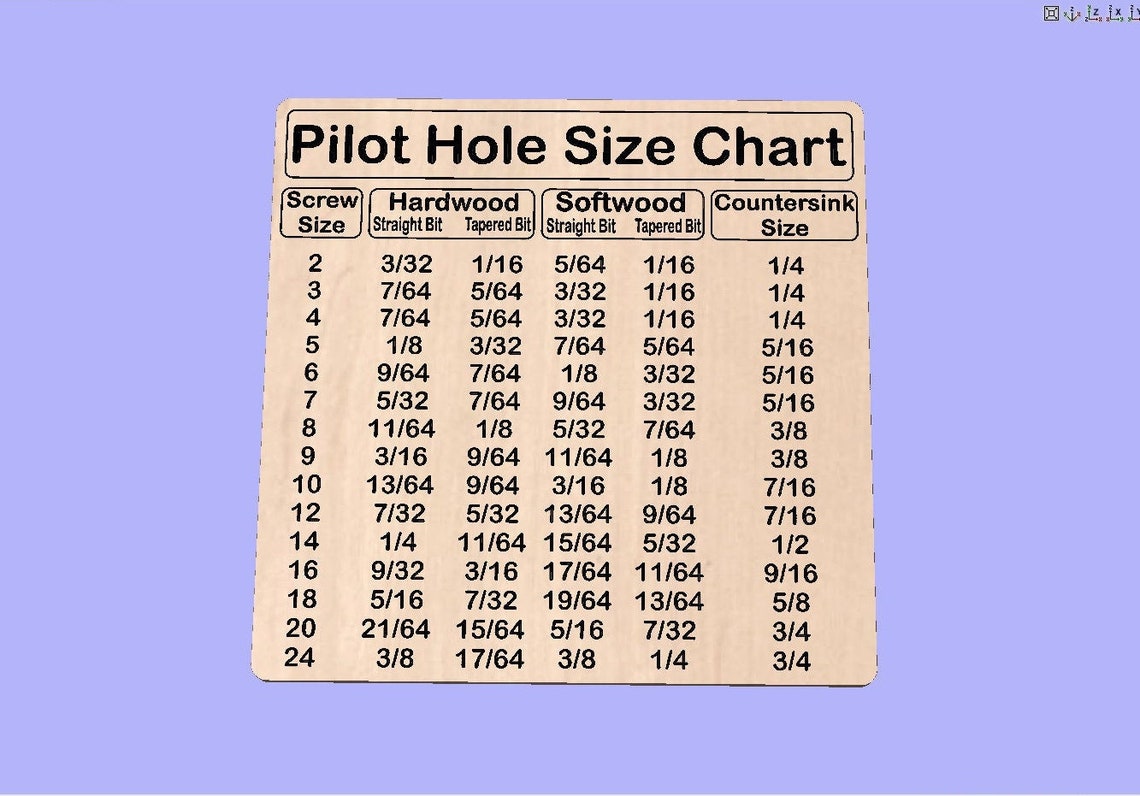
Pilot Hole Size Chart Metal
Ever stared at a piece of metal, a brilliant idea sparkling in your mind, and thought, "How do I make this thing actually come together?" You've got your trusty drill, your chosen screws or bolts practically vibrating with anticipation, but then… the terrifying question looms: What size hole do I drill? It’s like trying to fit a square peg into a round hole, but way more… metallic. And potentially disastrous for your project’s structural integrity. Don't worry, my DIY-loving friend, you’re not alone in this metal-bending, hole-drilling quandary! We’ve all been there, squinting at a tiny screw and a mighty chunk of steel, wondering if we’re about to create a permanent, wobbly monument to our drilling uncertainty.
Fear not! Because tucked away in the secret scrolls of the maker-verse, there exists a magical artifact. It’s not a dragon’s egg, nor is it a map to buried treasure (though sometimes a well-built project feels like treasure!). It’s something far more practical, something that whispers sweet-nothings of perfect fits and secure fastenings: the Pilot Hole Size Chart for Metal. Yes, it sounds a little… technical. A little… beige. But I’m here to tell you it’s actually your new best friend. Think of it as a cheat sheet for metalwork, a guardian angel for your screw-driving endeavors. Without it, you're basically playing DIY roulette with your precious metal! You might get lucky, sure, but you also might end up with a hole that’s too big, a screw that spins like a lonely dancer, or worse, a piece of metal that looks like it's been attacked by a particularly enthusiastic woodpecker. And who wants that?
This isn’t just about drilling holes; it’s about unlocking the potential of metal. It’s about making things strong, making things secure, and making things look like you actually know what you’re doing (even if, deep down, you’re just following the chart!).
Imagine this: You’re building a magnificent birdhouse out of sheet metal. A tiny sparrow-sized sanctuary. You've meticulously cut every piece, filed every edge, and you're ready to join them. You grab your screws and your drill. You think you know the right size. You drill. WHIZZ! The screw goes in, but it feels… loose. Like it’s having a leisurely Sunday stroll rather than firmly holding your avian abode together. The wind blows, a particularly brave robin lands, and CRACK! Your magnificent birdhouse is now a tragically deconstructed pile of metal. All because of a misunderstood hole. The horror!
Now, picture this: You consult the trusty Pilot Hole Size Chart for Metal. It calmly informs you, "For this specific screw, in this delightful gauge of metal, you, dear crafter, need a drill bit of precisely THIS diameter." You follow its wise counsel. You drill the exact hole. You insert the screw. CLICK! It bites, it holds, it’s as snug as a bug in a rug. Your birdhouse stands tall and proud, a testament to your precision and the power of a good chart. Birds flock to it, chirping their approval. You’ve created a masterpiece, and it all started with a little bit of forethought and a very helpful chart.

This chart is your secret weapon against the tyranny of ill-fitting fasteners. It’s like having a tiny, metal-whispering guru sitting on your shoulder, guiding your every drill bit. You’ll find charts that talk about different screw types – the ever-popular self-tapping screws that do all the hard work for you, or the more traditional machine screws that require a bit more finesse. And then there’s the metal itself! Thin sheet metal needs a different approach than a chunky, robust piece of steel. The chart understands this. It’s like a universal translator for metal and screws, bridging the gap between your vision and its tangible, sturdy reality.
Let’s get down to brass tacks (or should I say, steel rivets?). When you’re looking at a pilot hole chart for metal, you’ll typically see two main columns that are your absolute best friends: the screw size and the corresponding drill bit size. Sometimes, it’ll even get fancy and mention the tap drill size if you’re going the route of threading your own holes. But for most of us mere mortals, it’s all about finding that perfect match between the screw you’re using and the hole you’re creating.

Think of it like this: If you have a screw that’s a little bit skinny, you don’t want a hole so big it’s practically a gaping maw. The screw will just wobble around like it’s on a unicycle. Conversely, if your screw is a strapping young lad and you try to force it through a hole that’s too small, well, you’re likely to strip the screw, damage the threads (if any), or just end up with a bent screw and a very sad piece of metal. The chart, my friends, saves you from all these potential metal-mishaps. It ensures that when you screw something together, it’s going to stay together. No more embarrassing wiggles, no more unexpected collapses. Just pure, unadulterated, metal-joining joy!
So, the next time you’re embarking on a metal project, big or small, remember the unsung hero: the Pilot Hole Size Chart for Metal. It’s not just a list of numbers; it’s a key to success. It’s the difference between a project that looks finished and a project that is finished, strong and secure. Go forth, drill with confidence, and create something amazing! Your metal projects will thank you, and frankly, so will your future self when you’re not trying to explain why that shelf you built is slowly tilting towards the floor.