Transition Flashing Shingles To Metal
Hey there, fellow homeowners! So, you’ve been looking up at your roof lately, and maybe those trusty old shingles are starting to look a little… well, shabby. You know the feeling. They’ve seen better days, perhaps weathered a few too many hailstorms, and are whispering sweet nothings about retirement.
And then it hits you: the shiny, sleek allure of metal roofing! It’s like the superhero of the roofing world, right? Strong, durable, and oh-so-chic. But here’s the big question buzzing in your brain: can you just wave a magic wand and poof! Shingles be gone, metal be here? Or, more specifically, how do you handle those tricky spots where different roof planes meet – those are the transition flashing areas, my friends. Think of them as the roof’s fancy handshakes.
Don’t you worry your pretty little head about it! We’re going to break down the whole "transition flashing shingles to metal" thing in a way that’s so easy, you’ll be explaining it to your cat. And believe me, my cat is a tough crowd.
The "Why" Behind the Shingle-to-Metal Tango
First off, why are we even talking about this? Well, as I mentioned, shingles have a lifespan, bless their asphaltic hearts. Eventually, they get brittle, lose their granules (making them look like they’re shedding like a nervous dog), and can start to curl. And let's be honest, a roof that looks like it's perpetually worried isn't exactly a confidence booster.
Metal roofing, on the other hand, is practically a superhero. It’s fire-resistant, can handle crazy weather like a champ, is energy-efficient (hello, lower bills!), and can last for decades. We’re talking 50 years, maybe more! It’s like the difference between a trendy fast-fashion outfit and a classic, well-tailored suit that never goes out of style.
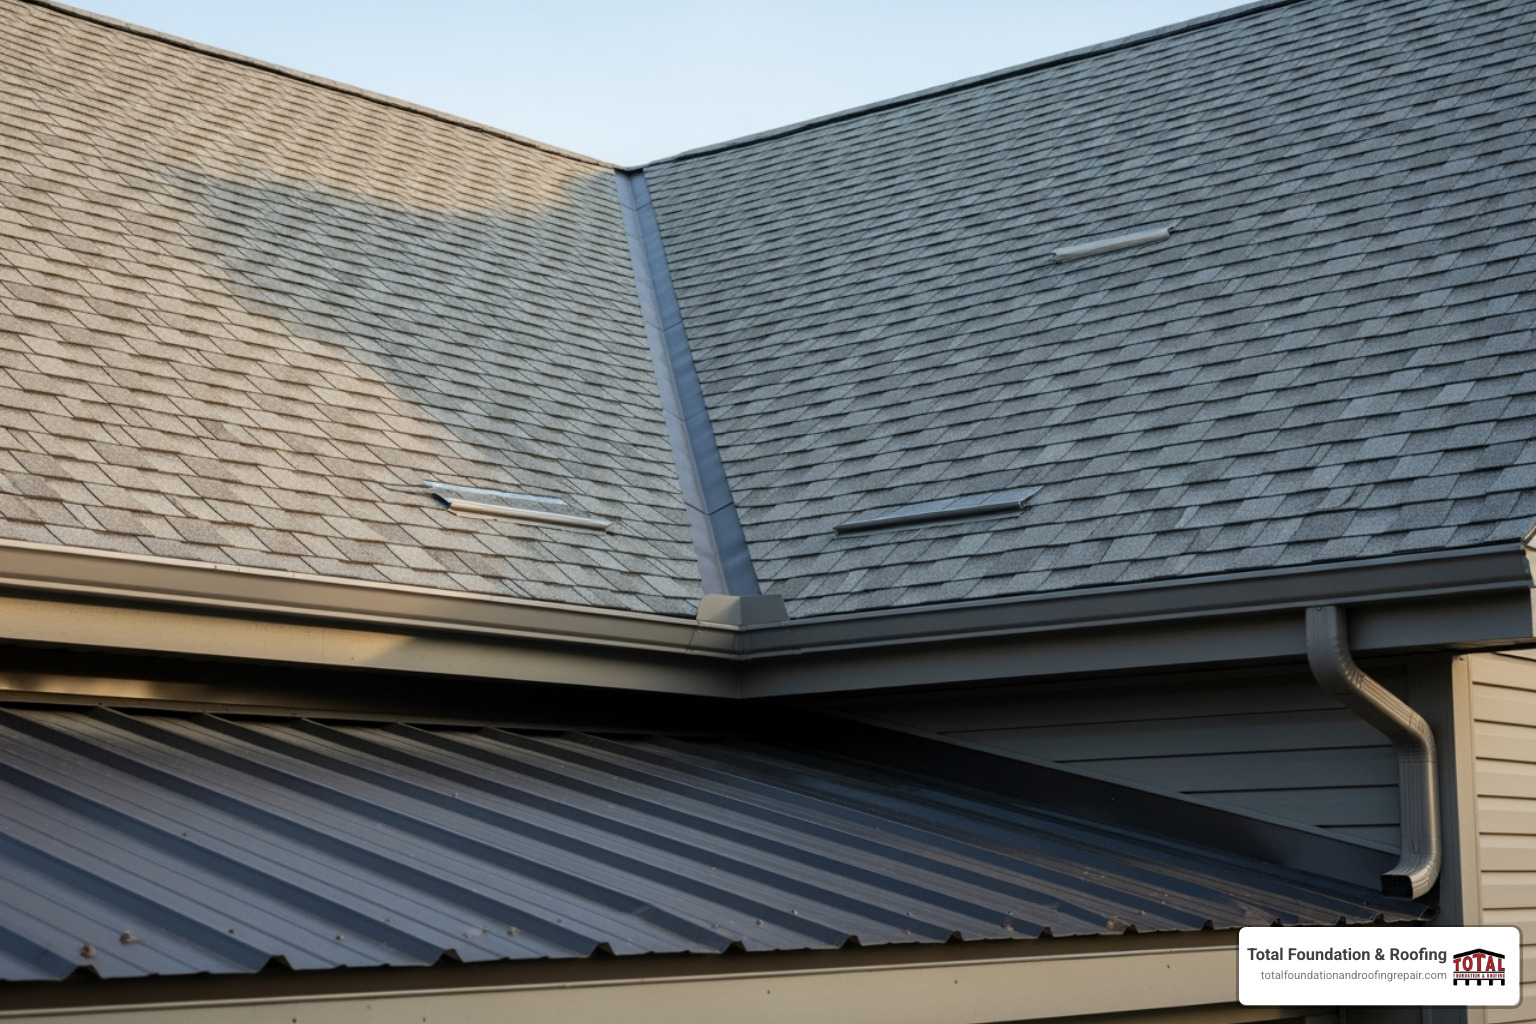
But here’s the kicker: a roof isn't just a flat surface. It’s a complex architectural masterpiece with valleys, hips, ridges, and those crucial transition points. And that's where our star of the show, transition flashing, comes in. It’s the unsung hero, the silent guardian, the… well, you get the idea. It’s the waterproofing wizard that prevents water from making a grand entrance where it’s not invited. And when you’re switching from shingles to metal, things get a little more… interesting.
Shingles vs. Metal: A Little Love-Hate Relationship
Shingles are pretty forgiving, you know? They’re flexible, they bend, they kind of mold themselves to the roof deck. And when you’re working with shingles and flashing, it’s usually a bit more forgiving. Think of it like working with Play-Doh. You can squish and shape it pretty easily.
Metal, however, is a bit more… particular. It’s rigid, it expands and contracts with temperature changes (like a grumpy old man on a cold morning), and it needs to be installed with precision. It’s less Play-Doh, more like… well, finely crafted LEGOs. Everything has to fit just right.
So, when you have a transition point where shingles are ending and metal is beginning, you can’t just slap a generic piece of metal there and call it a day. Nope. You need to be smart about it, and that’s where the art of transition flashing truly shines.
The Nitty-Gritty: How Does This Shingle-to-Metal Transition Actually Happen?
Okay, let’s get down to the nitty-gritty, but don’t let the word "nitty-gritty" scare you. We’re keeping it light! Imagine you have two different roof planes meeting. Maybe it’s a valley where two slopes come together, or perhaps it’s where the main roof meets a dormer or a steeper section.
With shingles, you might have a standard valley flashing or some basic step flashing. But when metal enters the picture, things need to be a bit more robust and a lot more carefully planned. The goal is to create a seamless waterproof barrier that can handle whatever the sky throws at it, from a gentle drizzle to a torrential downpour.
One of the most common scenarios is dealing with a roof valley. In the old shingle world, you might have had open-channel valley flashing or closed-cut valleys. With metal, especially standing seam metal, you’ll likely be looking at a custom-fabricated valley liner. This isn't just a flat piece of metal; it's often bent and shaped to create a channel that efficiently directs water away from the transition point.
Think of it like this: shingles are like a bunch of little soldiers in a trench, and they can overlap each other pretty easily. Metal is more like a perfectly engineered drainage system. You need to guide that water precisely, and the flashing is the conductor of that watery orchestra.

Common Transition Flashing Techniques for Shingle-to-Metal
So, what are some of the ways this magic is performed? Well, it really depends on the type of metal roofing you’re using and the specific architectural design of your roof. But here are a few concepts you might hear your roofing pro talk about:
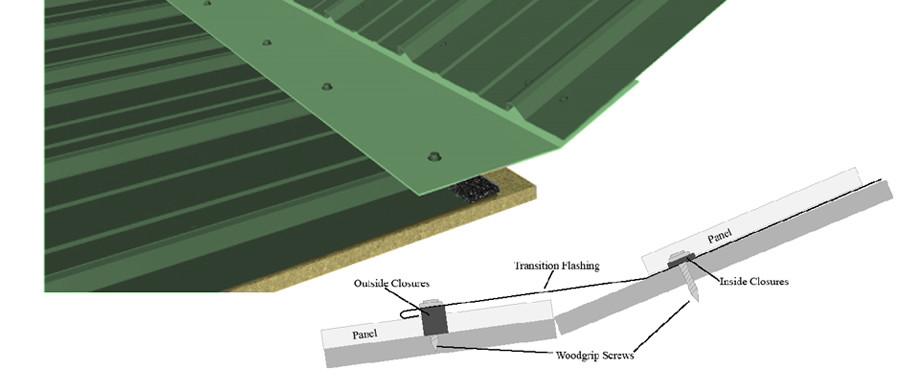
1. Custom Fabricated Metal Flashing: This is your most common and often most effective solution. A skilled metal fabricator will custom-bend metal (usually the same material as your new metal roof, for consistency and expansion/contraction compatibility) to fit the specific angles and dimensions of your transition. This could be for valleys, hips, or even where the metal meets a chimney or skylight. It’s like a bespoke suit for your roof!
2. Integrated Flashing Systems: Some metal roofing systems come with integrated flashing components. These are designed to work seamlessly with the roofing panels. For a shingle-to-metal transition, this might involve a specific type of starter piece or a specialized flashing that overlaps the shingles and tucks under the metal panels. It’s all about creating layers of protection.
3. The "Over-Under" Approach: This is where you really need to be careful. Typically, you want the water-shedding material to be on top. So, in many transition scenarios, the metal flashing will be installed under the new metal roofing panels but over the shingles. The idea is to create a barrier that water hits first before it gets a chance to sneak under the metal. It’s a bit like a strategically placed umbrella for your roof.
4. Sealants and Fasteners: Of course, no flashing job is complete without the right sealants and fasteners. These aren't just random nails and goop! We’re talking about specialized roofing sealants that remain flexible and waterproof over time, and fasteners that are designed to prevent leaks. The type of fastener and how it's installed is crucial, especially with metal.
When Do You Really Need to Worry About This?
Honestly, you don’t need to worry in the sense of losing sleep. But you absolutely need to be aware. If you’re replacing your entire roof and going from shingles to metal, the transition flashing is a critical part of the project. It’s not an afterthought; it’s an integral component of the new system.

If you’re only replacing a small section of your roof, and it happens to be a transition area between existing shingles and a new metal section, then it becomes even more important to get it right. Mismatched materials or improper flashing in these spots are a recipe for water damage, which is about as fun as a root canal.
Here are some red flags that might mean your current flashing (or a potential new installation) isn’t up to snuff:
- Visible signs of rust on metal flashing.
- Cracked or deteriorating sealant around flashing.
- Water stains on your ceiling or walls, especially near roof intersections.
- Moss or algae growing excessively on flashing, which can indicate trapped moisture.
- Loose or missing flashing pieces.
If you see any of these, it’s probably time to call in the pros! Don’t try to DIY your way out of a flashing nightmare, unless you’re secretly a roofing ninja, in which case, can I have your number?
The Role of the Professional Roofer
This is where your trusty roofing contractor earns their stripes. A good roofer understands the nuances of different roofing materials and how they interact. When you’re transitioning from shingles to metal, they’ll know:
- Which type of metal flashing is best suited for your specific roof design and climate.
- How to properly integrate the flashing with both the existing shingle underlayment and the new metal panels.
- The correct techniques for cutting, bending, and installing the metal flashing to ensure a watertight seal.
- The appropriate sealants and fasteners to use for long-term durability.
They’re not just slapping shingles on; they’re designing a waterproof system. And that involves understanding how water flows and how to intercept it effectively. It’s like a surgeon knowing where to make the incision – precision is key!

A Word on Aesthetics
Let’s not forget that your roof is also a big part of your home’s curb appeal! While functionality is king (or queen!), we also want it to look good, right? Transition flashing doesn’t have to be an eyesore. Modern metal roofing systems and skilled fabricators can create flashing that is both highly effective and aesthetically pleasing.
The right color and finish of the metal flashing can blend seamlessly with your new metal roof, or even create a subtle, intentional design element. It’s about harmonizing the different parts of your roof so that it looks like a cohesive, well-designed whole, not like a patchwork quilt made by a toddler. (No offense to toddlers and their artistic endeavors, of course.)
Future-Proofing Your Roof
Investing in a metal roof, with all the proper transition flashing done correctly, is an investment in the longevity and resilience of your home. It’s about peace of mind. It’s about knowing that your home is protected from the elements for years to come.
Think about it: no more worrying about those rogue shingles blowing off in a storm. No more fretting about ice dams forming in the winter. No more calling the roofer every other year for minor repairs. It’s a sigh of relief, delivered in metal!
So, while the idea of transitioning from shingles to metal might sound a bit daunting, especially when you think about those tricky transition flashing points, it’s actually a really exciting upgrade. It’s about embracing a modern, durable, and beautiful roofing solution.
And at the end of the day, isn't that what we all want? A home that’s safe, sound, and looks fantastic from every angle? When you see that beautiful new metal roof, with all its transitions handled with expert care, you’ll know you’ve made a brilliant decision. You’ll be looking up at your roof and thinking, “Yep, I nailed it!” And that, my friends, is a feeling that’s as solid and lasting as the metal itself. Now go forth and admire your awesome roof!